If you’re searching “How To Adjust Closing Force On Chamberlain Garage Door Opener”, your garage door may not be closing properly—or it might reverse unexpectedly. This is a common issue and often caused by incorrect force settings.
The good news? You can fix it yourself in just a few minutes with the right steps and a little caution.
How To Adjust Closing Force On Chamberlain Garage Door Opener
Let’s walk through the exact process to safely adjust the closing force and restore smooth operation.
Read too: Tc1 Tricode Garage Door Opener Remote W/ Clip Chamberlain: Complete Guide
What Is Closing Force on a Garage Door Opener?
Closing force controls how much power the opener uses to push the door downward.
Why It Matters:
- Too low → Door won’t fully close
- Too high → Safety risk (can damage objects or injure someone)
👉 Proper adjustment ensures safe and reliable operation.
Signs You Need to Adjust Closing Force
Look for these common symptoms:
- Door stops before fully closing
- Door reverses suddenly
- Door struggles near the floor
- Opener light flashes
Tools You’ll Need
- Flathead screwdriver
- Step ladder
- Safety gloves (optional)
Step-by-Step: How To Adjust Closing Force
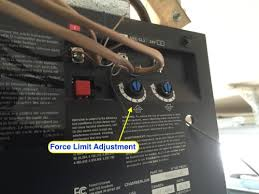
Step 1: Locate the Adjustment Screws or Dials
On most Chamberlain openers:
- Found on the back or side of the motor unit
- Labeled as:
- “Down Force”
- “Close Force”
Step 2: Identify the Correct Control
There are usually two controls:
- Up force (opening)
- Down force (closing)
👉 Make sure you adjust the closing (down) force only.
Step 3: Make Small Adjustments
- Turn the screw clockwise to increase force
- Turn counterclockwise to decrease force
- Adjust in small increments (about 1/8 turn at a time)
⚠️ Never make large adjustments at once.
Step 4: Test the Door After Each Adjustment
- Press the remote
- Observe the door closing behavior
Repeat until:
- Door closes completely
- No sudden reversal occurs
Step 5: Perform Safety Test
Place an object (like a piece of wood about 2 inches high) under the door.
- Close the door
- It should reverse upon contact
✅ If it doesn’t reverse → reduce closing force immediately.
Why Proper Adjustment Is Critical
Garage doors are heavy—often 100–200 pounds.
Improper force settings can:
- Damage property
- Cause injury
- Shorten opener lifespan
Modern systems include safety mechanisms to prevent accidents.
Learn more here:
https://en.wikipedia.org/wiki/Garage_door_opener
Common Problems After Adjustment
1. Door Still Won’t Close
Cause: Force too low or sensor issue
Fix: Increase force slightly or check sensors
2. Door Slams Shut
Cause: Force too high
Fix: Reduce force immediately
3. Door Reverses Randomly
Cause: Sensor misalignment or obstruction
Fix: Clean and align sensors
4. No Improvement
Cause: Mechanical issue (springs, tracks)
Fix: Inspect hardware or call a professional
Closing Force vs Travel Limits
Many people confuse these two settings.
Key Differences:
| Setting | Function |
|---|---|
| Closing Force | Power applied to close door |
| Travel Limit | How far the door moves |
👉 Both must be correctly adjusted for proper operation.
Real-Life Example
Scenario:
A garage door stops halfway and reverses.
Solution:
- Increase closing force by 1/8 turn
- Test after each adjustment
Result:
Door closes smoothly without reversing.
Advantages vs Disadvantages of Adjusting Closing Force
Advantages:
- Fixes closing issues quickly
- Improves door performance
- Enhances safety when done correctly
Disadvantages:
- Incorrect adjustment can be dangerous
- May not solve underlying mechanical issues
Maintenance Tips for Optimal Performance
- Inspect sensors monthly
- Lubricate moving parts every 6 months
- Check door balance annually
- Keep tracks clean
Safety Tips You Should Never Ignore
- Never disable safety sensors
- Always test reversal function
- Avoid excessive force settings
- Keep children away during adjustments
How Long Does It Take?
| Task | Time |
|---|---|
| Locate controls | 2 minutes |
| Adjust force | 3–5 minutes |
| Testing | 2 minutes |
👉 Total: Under 10 minutes
FAQ: How To Adjust Closing Force On Chamberlain Garage Door Opener
1. Why does my garage door reverse before closing?
Usually due to low closing force or sensor interference.
2. How much should I adjust the force?
Make small adjustments—about 1/8 turn at a time.
3. Is it safe to increase closing force?
Yes, but only slightly. Too much force can be dangerous.
4. What if adjusting force doesn’t fix the issue?
Check sensors, tracks, or springs for mechanical problems.
5. Do all Chamberlain openers have force controls?
Most models do, though newer ones may use digital settings.
6. Should I call a professional?
If the issue persists or involves springs, yes.
Conclusion
Now you know exactly how to adjust closing force on Chamberlain garage door opener—and it’s a simple fix that can make a big difference. With just a few careful adjustments, you can restore smooth operation and ensure your garage door closes safely every time.
Remember: small changes, frequent testing, and safety checks are key.
If this guide helped you, feel free to share it on social media—someone else might need this quick fix today! 🚪
Leave a Reply