Introduction
Is your old garage door opener acting up, leaving you wondering how difficult is it to replace a garage door opener? You are not alone; many homeowners face this exact dilemma when their trusted device finally gives out after years of loyal service. The good news is that with the right tools, safety precautions, and a little guidance, this project is highly manageable for a dedicated DIY enthusiast.
How Difficult Is It to Replace a Garage Door Opener?
When evaluating how difficult is it to replace a garage door opener, the honest answer is: moderately easy for a handy DIYer, but potentially challenging for a complete beginner. On a scale of 1 to 10, most home improvement experts rate this task a 4 or 5.
The complexity largely depends on your comfort level with basic hand tools, reading technical manuals, and working on a ladder. According to recent home maintenance surveys, over 60% of homeowners consider garage door opener replacement a achievable weekend project, provided they allocate about 3 to 5 hours for the job. The heaviest part of the task is safely supporting the motor unit (which can weigh between 15 to 30 pounds) while unbolting it from the ceiling bracket. With a helper and proper preparation, the physical difficulty is minimal.
What Tools and Materials Do You Need?
Before you begin, gathering the right equipment is crucial for a smooth workflow. Here is a checklist of essentials:
- 7-foot A-frame stepladder: For safe and stable access to the ceiling mount.
- Cordless drill/driver: Equipped with a 1/2-inch chuck and a set of drill bits.
- Adjustable wrench set: Specifically, 7/16-inch and 1/2-inch wrenches for rail bolts.
- Socket set: For removing and installing lag screws (typically 3/8-inch).
- Wire strippers and electrical tape: For safely connecting the new wiring.
- Assistant: Highly recommended for lifting and holding the new motor unit.
- Safety gear: Work gloves and safety glasses to protect against dust and debris.
Step-by-Step Guide to Replacing Your Garage Door Opener
If you are ready to tackle the project, follow this concrete, step-by-step tutorial to ensure a safe and successful installation.
Step 1: Disconnect Power and Release the Door
Safety first. Unplug the existing opener from the wall outlet or turn off the dedicated circuit breaker. Next, pull the red emergency release cord to disengage the door from the opener carriage. Manually lift the door to the fully open position and secure it with locking pliers on the track just below a roller to prevent it from falling.
Step 2: Remove the Old Opener
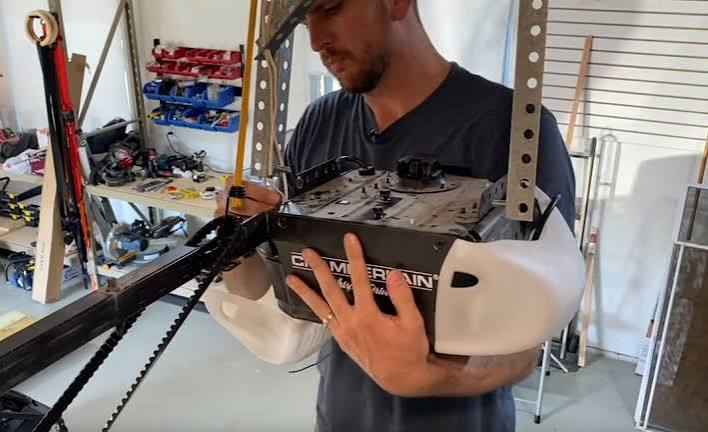
Have your assistant support the weight of the old motor unit. Disconnect the wiring from the motor head, wall console, and safety sensors. Carefully unbolt the ceiling bracket and the front rail from the header bracket above the door. Lower the unit and set it aside.
Step 3: Assemble the New Opener
Lay the new opener’s rail sections on a clean, flat floor. Connect the rail segments using the provided hardware, tightening the bolts to approximately 15–20 ft-lbs of torque. Attach the motor unit to the assembled rail, ensuring the chain or belt is properly tensioned according to the manufacturer’s specifications (usually about 1/4 inch of slack above the base of the rail).
Step 4: Mount the Header Bracket and Motor Unit
Install the new header bracket directly above the center of the garage door, typically 2 to 4 inches above the highest point of door travel. Secure it using two 3/8-inch x 1.5-inch lag screws drilled directly into a wooden structural support. With your assistant’s help, lift the assembled opener, attach the front of the rail to the header bracket, and secure the rear mounting strap to the ceiling joist.
Step 5: Install Safety Sensors and Wiring
Modern openers require photoelectric safety sensors. Mount these on each side of the door track, exactly 6 inches above the floor. Ensure the LED indicator lights on both sensors are solid (not blinking), which confirms they are perfectly aligned. Run the low-voltage wiring neatly along the wall and ceiling, securing it with staples every 12 inches.
Step 6: Test and Adjust the Limits
Plug the unit back in. Program the travel limits and force settings as detailed in your manual. Test the door by closing it; it should reverse immediately upon contacting a 1.5-inch block of wood placed on the floor. This is a mandatory safety feature.
(Note: For a deeper technical understanding of the mechanisms involved, you can refer to the general overview of a garage door opener on Wikipedia.)
DIY vs. Professional Installation: A Quick Comparison
Not sure whether to do it yourself or hire a pro? Use this comparison to decide what fits your situation best.
| Feature | DIY Installation | Professional Installation |
|---|---|---|
| Average Cost | $250 – $450 (Unit only) | $450 – $700+ (Unit + Labor) |
| Time Required | 3 to 5 hours | 1.5 to 2.5 hours |
| Difficulty Level | Moderate (Requires basic tools) | None (Handled by experts) |
| Warranty | Manufacturer parts only | Parts + Labor warranty |
| Best For | Handy homeowners on a budget | Those seeking convenience & guaranteed safety |
Common Mistakes to Avoid During Replacement
Even experienced DIYers can stumble. Avoid these pitfalls to ensure a long-lasting installation:
- Ignoring the Torsion Springs: Never attempt to adjust or disconnect the high-tension springs yourself. This is extremely dangerous and should only be handled by certified professionals.
- Misaligning the Safety Sensors: If the sensors are even slightly out of parallel, the door will refuse to close. Take your time to get the alignment perfect.
- Skipping the Manual: Every brand has unique limit-switch adjustments. Guessing the settings can damage the motor or the door panels.
- Using Inadequate Anchors: If your ceiling joists are not standard wood, you must use appropriate toggle bolts or structural anchors rated for dynamic loads.
Frequently Asked Questions (FAQ)
Q1: Can I replace a garage door opener by myself?
Yes, absolutely. If you are comfortable using basic hand tools, reading instructions, and working on a ladder with a helper, you can successfully replace a garage door opener by yourself. It is designed to be a consumer-friendly DIY project.
Q2: How long does it take to replace a garage door opener?
For a first-timer, expect the process to take between 3 to 5 hours. This includes unboxing, assembling the rail, removing the old unit, mounting the new one, wiring, and testing. Professionals typically complete the same job in under 2 hours.
Q3: Do I need to replace the garage door rails when replacing the opener?
Not always. If your existing rails are straight, rust-free, and compatible with the new motor’s carriage type (e.g., chain, belt, or screw drive), you can reuse them. However, most new openers come with a matched rail system, and using the new rail ensures optimal performance and warranty coverage.
Q4: What is the average cost to replace a garage door opener?
The cost of a new, high-quality garage door opener ranges from $250 to $450, depending on the type (chain-drive is cheapest, belt-drive is quieter and slightly more expensive, and smart Wi-Fi models are at the premium end). Professional installation adds roughly $150 to $250 in labor costs.
Q5: Can I use my old remote controls with a new garage door opener?
Generally, no. Older remotes operate on different radio frequencies and rolling-code security protocols than modern openers. You will need to use the new remotes provided in the box, though you can often purchase additional compatible remotes separately.
Conclusion
Replacing a garage door opener does not have to be a daunting task. By understanding how difficult is it to replace a garage door opener, gathering the right tools, and following a methodical, safety-first approach, you can save hundreds of dollars in labor costs while gaining a valuable home maintenance skill. The result is a quieter, safer, and more reliable entry point for your home.
Did you find this guide helpful? Share this article on Facebook, Twitter, or Pinterest to help your friends and family tackle their own home improvement projects with confidence! If you have any questions or personal tips, leave a comment below—we love hearing from our DIY community.
Leave a Reply