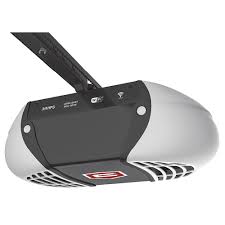
Is your garage door stuck halfway or making strange grinding noises? You are not alone. Thousands of homeowners face this frustration every year, often fearing expensive repair bills. The good news is that most issues with a Craftsman 1/2 HP garage door opener replacement parts scenario can be resolved with simple, affordable components. This guide will help you identify exactly what you need to get your door moving smoothly again.
Why Do Craftsman 1/2 HP Openers Fail?
Understanding why your opener fails is the first step toward a successful repair. The 1/2 horsepower motor is a workhorse designed for standard single-car or lightweight double-car doors. However, like any mechanical system, it suffers from wear and tear over time.
According to industry data, the average lifespan of a garage door opener is between 10 to 15 years. If your unit is older, parts like gears and sensors are likely reaching the end of their service life. A study by the International Door Association notes that lack of regular maintenance accounts for nearly 30% of premature opener failures.
Common signs that you need replacement parts include:
- The motor runs, but the door does not move.
- Loud grinding or screeching sounds during operation.
- The door reverses immediately after touching the floor.
- Remote controls fail to respond despite fresh batteries.
Identifying the Right Replacement Parts
Not all Craftsman openers are built the same. Even within the 1/2 HP category, there are different models, such as the belt-drive, chain-drive, and screw-drive variants. Using the wrong part can lead to improper fitment or even safety hazards.
Check Your Model Number
Before buying anything, locate the model number. It is usually found on a label on the back or side of the motor unit. Common series include the 139.536XX or 41AXXXX series. Write this down before proceeding.
Common Parts That Need Replacement
Here is a breakdown of the most frequently replaced components for a Craftsman 1/2 HP unit:
| Component | Function | Signs of Failure |
|---|---|---|
| Gear and Sprocket Assembly | Transfers motor power to the chain/belt | Grinding noise, motor hums but door doesn’t move |
| Logic Board | Controls timing and safety features | Lights flash erratically, unresponsive remotes |
| Safety Sensors | Prevents door from closing on objects | Door reverses immediately, LED lights blink |
| Chain/Belt | Physically pulls the door up | Slipping, visible wear, or broken links |
| Capacitor | Helps start the motor | Motor struggles to start, humming sound |
For a deeper understanding of how these mechanical systems interact, you can refer to general mechanical principles outlined on Wikipedia’s page on Garage Door Openers.
Step-by-Step Guide to Replacing the Gear Assembly
The gear assembly is the most common failure point in Craftsman 1/2 HP openers. The plastic gears wear down over time, causing the motor to spin without moving the door. Here is how to replace them safely.
Safety First: Always unplug the opener from the power source before starting any repair. Disconnect the emergency release cord to manually operate the door if needed.
- Remove the Motor Cover: Use a screwdriver to remove the screws holding the plastic cover of the motor unit. Set them aside in a safe place.
- Disconnect the Chain: Locate the tension spring on the rail. Release the tension to slacken the chain. Remove the clevis pin connecting the arm to the door bracket.
- Access the Gears: You will see a large white plastic gear and a smaller metal sprocket. Note the orientation of the wires connected to the logic board. Take a photo with your phone for reference.
- Remove Old Gears: Unscrew the retaining clips holding the gear assembly. Carefully pull out the worn plastic gear and the metal sprocket. Clean any old grease from the housing.
- Install New Parts: Insert the new metal sprocket and plastic gear. Ensure they mesh correctly. Apply a small amount of lithium-based grease to the gears. Do not use WD-40, as it attracts dust and dries out quickly.
- Reassemble: Replace the retaining clips and reconnect the chain. Adjust the tension so the chain has about 1/4 inch of slack.
- Test the Unit: Plug the opener back in. Test the remote control. If the door moves smoothly, the repair was successful.
Troubleshooting Sensor and Logic Board Issues
If the gears are fine but the door still won’t close, the issue might be electronic. Safety sensors are required by law in the US since 1993 to prevent accidents.
Aligning the Safety Sensors
Most sensor issues are due to misalignment. Look at the small LED lights on the sensors near the floor. One should be green (power), and the other should be amber (receiving signal). If the amber light is blinking or off:
- Check for obstructions like leaves or boxes.
- Ensure both sensors are at the same height.
- Tighten the wing nuts to hold them firmly in place.
Resetting the Logic Board
Sometimes, the brain of the opener needs a reset. Unplug the unit for 5 minutes. This clears any temporary memory errors. Plug it back in and reprogram your remotes according to the manual. If the problem persists, the logic board may need replacement. This is a more advanced repair and may require professional assistance if you are uncomfortable working with electrical components.
Where to Buy Authentic Craftsman Parts
Using genuine parts ensures compatibility and longevity. While third-party parts are cheaper, they often use inferior materials that wear out faster.
- Official Craftsman Website: Offers guaranteed compatibility and warranties.
- Local Hardware Stores: Many carry common items like gears and sensors.
- Online Retailers: Amazon and eBay have vast selections, but verify the seller’s rating and part number carefully.
Always compare the part number on your old component with the new one. Even a single digit difference can mean the part will not fit.
FAQ Section
Q: Can I use a universal gear kit for my Craftsman 1/2 HP opener?
A: While some universal kits claim compatibility, it is risky. Craftsman uses specific gear ratios and shaft sizes. It is highly recommended to use a kit specifically labeled for your model series to ensure proper fit and function.
Q: How often should I lubricate my garage door opener?
A: You should lubricate the chain, screws, and rollers every six months. Use a silicone-based or lithium-based lubricant. Avoid oil-based products as they attract dirt and gum up the mechanism.
Q: Is it safe to replace the logic board myself?
A: Yes, if you follow safety protocols. Always unplug the unit. Take photos of wire connections before disconnecting them. If you are unsure about electrical work, consult a professional technician.
Q: Why does my garage door reverse before hitting the floor?
A: This is usually a sensitivity issue. Locate the force adjustment knobs on the motor unit. Turn the “close” force knob slightly clockwise to increase the force. Also, check the safety sensors for alignment issues.
Q: What is the difference between chain-drive and belt-drive openers?
A: Chain-drive openers are more durable and cheaper but noisier. Belt-drive openers use a rubber belt, making them much quieter and smoother, ideal for garages attached to living spaces. Both types use similar internal gears and motors.
Conclusion
Fixing your Craftsman 1/2 HP garage door opener replacement parts is a manageable DIY project that can save you hundreds of dollars. By identifying the correct model, using genuine parts, and following safety guidelines, you can restore your garage door’s functionality quickly. Remember, regular maintenance is key to preventing future breakdowns.
If you found this guide helpful, please share it with your friends and neighbors on social media. Helping others keep their homes safe and functional is what community is all about. Stay safe, and happy repairing!
Leave a Reply