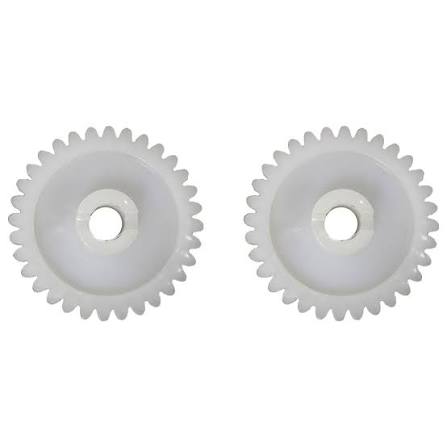
Is your garage door making a terrible grinding noise, or worse, refusing to open at all? You are not alone; this is one of the most common issues homeowners face with older opener models. Fortunately, installing a Craftsman 1/2 HP garage door opener replacement gear is a cost-effective solution that can restore smooth operation without requiring a professional technician.
In this guide, we will walk you through everything you need to know about identifying the problem, choosing the right parts, and performing the repair safely. By the end of this article, you will have the confidence to tackle this repair yourself and save hundreds of dollars in service fees.
Why Does the Gear Fail in Craftsman 1/2 HP Openers?
Before diving into the repair, it is essential to understand why this component fails. Most Craftsman 1/2 HP garage door openers manufactured between the late 1990s and early 2010s use a plastic drive gear. This design choice was made to reduce noise and cost, but it comes with a significant trade-off: durability.
Over time, the plastic teeth wear down due to constant friction and the heavy load of lifting the door. This is often referred to as “stripping the gear.” When the teeth strip, the motor continues to run, but the force is not transferred to the chain or screw drive that moves the door.
According to industry data, mechanical wear accounts for over 60% of garage door opener failures in units older than ten years. Understanding this helps you realize that replacing the gear is not just a fix; it is a necessary maintenance step for extending the life of your opener.
Signs Your Gear Needs Replacement
How do you know if the gear is the culprit? Look for these specific symptoms:
- Grinding Noise: A loud buzzing or grinding sound when you press the remote.
- Motor Runs, Door Doesn’t Move: The light on the opener turns on, and you hear the motor humming, but the door remains stationary.
- Jerky Movement: The door starts to move but stops abruptly or moves unevenly.
- Visible Debris: You may find small white plastic shavings near the motor housing, which are remnants of the worn gear.
If you experience any of these issues, it is highly likely that your drive gear has failed. For more technical details on garage door mechanics, you can refer to Wikipedia’s entry on Garage Door Openers to understand the broader system components.
Choosing the Right Craftsman 1/2 HP Replacement Gear
Not all gears are created equal. When searching for a Craftsman 1/2 HP garage door opener replacement gear, you must ensure compatibility with your specific model number. Using the wrong part can lead to further damage or safety hazards.
Key Factors to Consider
- Model Compatibility: Check the label on your opener unit. Common series include the 139.536xx, 139.539xx, and 139.537xx series. Each may require a slightly different gear kit.
- Material Quality: Opt for kits that include a metal worm gear or reinforced nylon gears. While original equipment manufacturer (OEM) parts are plastic, many aftermarket kits offer upgraded materials for longer lifespan.
- Kit Contents: A good replacement kit should include not just the main drive gear, but also the thrust washer, retention clip, and lubricant. Replacing only the gear while ignoring worn washers can cause premature failure.
| Feature | OEM Plastic Gear | Aftermarket Reinforced Gear |
|---|---|---|
| Durability | Moderate (5-7 years) | High (10+ years) |
| Noise Level | Quiet | Slightly louder initially |
| Cost | $15 – $25 | $25 – $40 |
| Availability | High | Moderate |
Step-by-Step Guide to Replacing the Gear
Replacing the gear requires patience and attention to detail. Follow these steps carefully to ensure a successful repair.
Tools You Will Need
- Phillips head screwdriver
- Flathead screwdriver
- Socket set (usually 7mm or 1/4 inch)
- Needle-nose pliers
- Clean rag
- Lithium-based grease (often included in the kit)
Step 1: Safety First
Disconnect the power to the garage door opener by unplugging it from the outlet. If your unit is hardwired, turn off the circuit breaker. Never attempt this repair with the power on. Additionally, disconnect the emergency release cord to ensure the door does not move unexpectedly.
Step 2: Remove the Light Cover and Lens
Use your Phillips head screwdriver to remove the screws holding the light lens cover. Set the screws aside in a safe place. Remove the light bulbs to prevent breakage during the repair.
Step 3: Access the Motor Assembly
Locate the screws securing the motor housing to the main body of the opener. There are typically four to six screws. Remove them carefully and lift the motor assembly out. You may need to disconnect the wire harness connecting the motor to the logic board. Note the position of each wire for reassembly.
Step 4: Remove the Old Gear
Once the motor is accessible, locate the drive gear. It is usually held in place by a metal retention clip. Use your needle-nose pliers to carefully remove the clip. Be cautious: the spring-loaded clip can fly off unexpectedly.
Pull the old gear off the motor shaft. You will likely see significant wear on the teeth. Clean the shaft and surrounding area with a clean rag to remove old grease and plastic debris.
Step 5: Install the New Gear
Apply a thin layer of lithium-based grease to the new gear and the motor shaft. Slide the new Craftsman 1/2 HP garage door opener replacement gear onto the shaft. Ensure it sits flush and aligns correctly with the worm gear.
Replace the thrust washer and secure the assembly with the new retention clip provided in your kit. Ensure the clip is fully seated in its groove.
Step 6: Reassemble and Test
Reconnect the motor wiring harness exactly as it was before. Place the motor assembly back into the housing and secure it with the screws. Replace the light lenses and bulbs.
Plug the opener back in and test the operation. Press the wall button to open and close the door. Listen for smooth operation and absence of grinding noises. If the door operates smoothly, you have successfully completed the repair.
Maintenance Tips to Extend Gear Life
To prevent future failures, consider these maintenance tips:
- Lubricate Regularly: Apply lithium-based grease to the gear and chain/screw drive every six months. Avoid using WD-40, as it attracts dust and dries out quickly.
- Balance Your Door: An unbalanced door puts extra strain on the opener. Disconnect the opener and manually lift the door. It should stay in place when halfway open. If it falls or rises, call a professional to adjust the springs.
- Inspect Annually: Check for signs of wear on the gear and other moving parts once a year. Early detection can prevent complete failure.
FAQ Section
Q1: Can I replace just the gear, or do I need to replace the whole opener?
A: In most cases, replacing just the gear is sufficient and much more cost-effective. However, if your opener is over 15 years old or has other electrical issues, replacing the entire unit might be a better long-term investment.
Q2: How long does it take to replace the gear?
A: For a DIYer with basic tools, the process typically takes 1 to 2 hours. First-time repairs may take longer due to careful disassembly and reassembly.
Q3: Is it safe to do this repair myself?
A: Yes, as long as you disconnect the power source before starting. The primary risks are electrical shock and pinching fingers. Always follow safety guidelines and use proper tools.
Q4: Where can I buy a Craftsman 1/2 HP garage door opener replacement gear?
A: You can purchase replacement gears from home improvement stores like Lowe’s or Home Depot, online retailers like Amazon, or specialized garage door parts websites. Ensure you verify compatibility with your model number.
Q5: Why does my new gear make noise?
A: New gears may make slight noises during the initial break-in period. Ensure you have applied adequate lubrication. If the noise persists or is loud, check that the gear is properly seated and the retention clip is secure.
Q6: What if the door still doesn’t work after replacing the gear?
A: If the door still fails to operate, the issue may lie with the motor capacitor, the logic board, or the safety sensors. Consult the owner’s manual or contact a professional technician for further diagnosis.
Conclusion
Replacing the Craftsman 1/2 HP garage door opener replacement gear is a straightforward repair that can save you significant money and extend the life of your opener. By understanding the signs of failure, choosing the right parts, and following our step-by-step guide, you can restore smooth and quiet operation to your garage door.
Remember, regular maintenance is key to preventing future issues. Keep your opener lubricated and your door balanced to ensure years of reliable service. If you found this guide helpful, please share it with friends or family who might be facing similar garage door woes. Happy repairing!
Leave a Reply