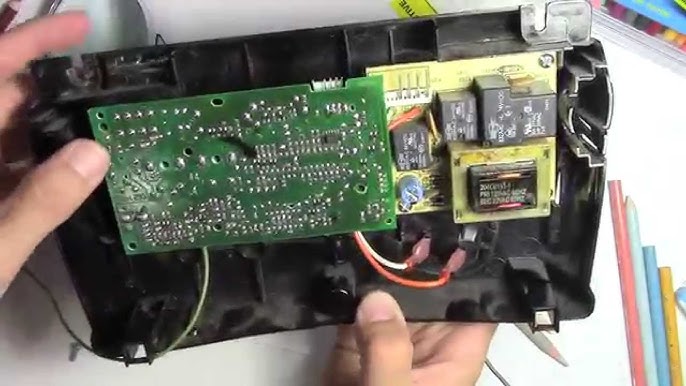
Is your garage door refusing to open, closing unexpectedly, or simply ignoring your remote commands? These frustrating issues often point to a single culprit: a failed circuit board. For many homeowners, understanding how to handle a Craftsman 1/2 HP garage door opener logic board replacement is the key to restoring convenience and security without breaking the bank on professional service calls.
Garage door openers are the unsung heroes of our daily routines. We rely on them every day, yet we rarely think about their inner workings until something goes wrong. When that happens, the silence of a non-responsive motor can be stressful. But before you call a technician, it is worth knowing that many common electronic failures can be resolved with a straightforward component swap. This guide will walk you through everything you need to know, from diagnosing the problem to installing the new part with confidence.
Why Does the Logic Board Fail in Craftsman Openers?
Before diving into the repair, it helps to understand why this component fails. The logic board, often called the main control board or motherboard, is the brain of your garage door opener. It processes signals from your wall button, remote controls, and safety sensors.
In a 1/2 HP Craftsman model, which is designed for standard single-car or lightweight double-car doors, the board handles significant electrical traffic. Over time, several factors can lead to failure:
- Power Surges: Lightning strikes or fluctuations in your home’s grid can fry sensitive microchips.
- Heat and Humidity: Garages are often uninsulated spaces. Extreme temperature swings and moisture can corrode solder joints and components.
- Age and Wear: Like any electronic device, capacitors and resistors have a lifespan. Most opener boards last between 7 to 10 years.
- Short Circuits: If wiring insulation degrades or pests chew on wires, it can send incorrect voltage to the board.
According to industry data, electronic control failures account for nearly 30% of all garage door opener service calls. Understanding this helps you realize that replacing the board is not just a fix; it is a standard maintenance procedure for older units.
Signs You Need a Logic Board Replacement
How do you know it is the board and not the motor or the remote? Diagnosing the issue correctly saves you from buying unnecessary parts. Here are the most common symptoms indicating a faulty logic board:
- No Response from Any Control: If neither the wall switch nor the remote works, and the light bulb does not turn on, the board may not be receiving or processing power.
- Intermittent Operation: The door works sometimes but not others, often requiring multiple button presses.
- Burning Smell: A distinct ozone or burnt plastic smell near the motor unit is a clear sign of electrical component failure.
- Visible Damage: If you open the casing and see bulging capacitors, charred areas, or loose wires on the green circuit board, it needs replacement.
- Error Codes: Some newer Craftsman models flash specific LED patterns to indicate board errors. Consult your manual for these codes.
| Symptom | Likely Cause | Solution |
|---|---|---|
| Remote works, wall button doesn’t | Wiring issue or button failure | Check wiring first |
| Nothing works (no lights) | Power supply or Logic Board | Replace Logic Board |
| Door reverses immediately | Sensor alignment or Board | Check sensors, then Board |
| Burning smell | Overheated components | Replace Logic Board immediately |
Step-by-Step Guide to Replacing the Logic Board
Replacing the logic board is a manageable DIY project if you follow safety protocols. Always prioritize safety when working with electricity and heavy mechanical doors.
Step 1: Safety First – Disconnect Power
Never work on a live garage door opener. Locate the power cord plugged into the ceiling outlet and unplug it. If your unit is hardwired, turn off the corresponding circuit breaker in your home’s electrical panel. Use a voltage tester to confirm there is no current running to the unit.
Step 2: Access the Logic Board
Remove the light lens cover if necessary. Most Craftsman 1/2 HP models have a plastic casing that snaps or screws off. Look for the main circuit board, which is usually a green rectangular board with various wires connected to it. Take a photo of the wiring configuration with your phone before disconnecting anything. This visual reference is invaluable during reassembly.
Step 3: Remove the Old Board
Carefully disconnect all wire harnesses. Note that some connectors are keyed (they only fit one way), while others may look similar. Label them if needed using masking tape. Unscrew the mounting screws holding the board in place. Gently lift the old board out.
Step 4: Install the New Board
Position the new Craftsman 1/2 HP garage door opener logic board in the same orientation. Secure it with the mounting screws. Reconnect all wire harnesses exactly as they were on the old board. Refer to the photo you took earlier. Ensure each connector clicks firmly into place.
Step 5: Restore Power and Test
Plug the unit back in or turn the circuit breaker on. The opener’s light may flash, indicating it is in programming mode. Test the wall button first. If the door operates correctly, test your remote controls. You may need to reprogram your remotes and keypad according to the manufacturer’s instructions.
For more detailed technical specifications on garage door opener components, you can refer to general engineering principles outlined on Wikipedia.
Choosing the Right Replacement Part
Not all logic boards are created equal. Using an incompatible board can damage your opener or create safety hazards.
- Check the Model Number: Look for the sticker on the motor unit. It will list a model number (e.g., 139.536XX, 139.539XX). Match this exactly when purchasing.
- OEM vs. Aftermarket: Original Equipment Manufacturer (OEM) parts are guaranteed to fit and function correctly. Aftermarket boards may be cheaper but vary in quality. For critical safety devices like garage doors, OEM is recommended.
- Verify Horsepower: Ensure the board is rated for a 1/2 HP motor. Using a board designed for a 3/4 HP unit may not provide the correct voltage regulation.
Common Mistakes to Avoid
Even experienced DIYers can make errors. Here is what to watch out for:
- Ignoring Safety Sensors: If the door closes and immediately reverses after the board replacement, check the safety eyes. They may have been bumped during the process.
- Forcing Connectors: If a wire harness does not plug in easily, do not force it. Check for bent pins or incorrect orientation.
- Skipping Reprogramming: New boards often wipe previous memory. Be prepared to reprogram all remotes and keypads.
- Not Securing Wires: Loose wires can vibrate against moving parts or short out. Use zip ties to keep wiring neat and away from the drive chain or screw.
FAQ Section
1. How much does it cost to replace a Craftsman logic board?
The cost of the part typically ranges from $30 to $80, depending on whether you choose OEM or aftermarket. If you hire a professional, labor costs can add $100 to $200, making DIY a significant savings opportunity.
2. Can I repair the old logic board instead of replacing it?
While minor issues like blown fuses can be fixed, most modern boards use surface-mounted components that require specialized soldering equipment and skills. For most homeowners, replacement is safer, faster, and more reliable.
3. Will replacing the logic board fix a noisy garage door?
No. Noise is usually related to mechanical parts such as rollers, hinges, or the drive chain/screw. The logic board controls electronic signals, not mechanical movement. If your door is noisy, lubricate the moving parts or replace worn rollers.
4. How long does a replacement logic board last?
A high-quality replacement board should last another 7 to 10 years, assuming it is protected from power surges and extreme environmental conditions. Using a surge protector can extend its lifespan.
5. Is it safe to use the garage door while waiting for the new board?
If the door is stuck closed, you can manually disengage the opener using the emergency release cord (usually a red rope hanging from the trolley). This allows you to open and close the door by hand. However, ensure the door is balanced and moves smoothly to avoid injury.
Conclusion
Dealing with a malfunctioning garage door is inconvenient, but it does not have to be expensive or complicated. By understanding the signs of failure and following a systematic approach, you can successfully complete a Craftsman 1/2 HP garage door opener logic board replacement in under an hour. This DIY fix not only restores your daily routine but also gives you a deeper understanding of your home’s systems.
Remember, safety is paramount. Always disconnect power before starting, and double-check your wiring connections. If you feel unsure at any point, consulting a professional is always a valid option. However, for most homeowners, this repair is well within reach.
Did this guide help you get your garage door working again? Share your success story on social media or leave a comment below to help other homeowners tackle their repairs with confidence!
Leave a Reply