Introduction
Is your Craftsman 1/2 HP garage door opener making grinding noises or struggling to open and close properly? You’re not alone—gear wear is one of the most common issues homeowners face with garage door openers, and knowing how to perform a Craftsman 1/2 HP garage door opener gear replacement can save you hundreds of dollars in professional repair costs. This comprehensive guide will walk you through everything you need to know about identifying worn gears, selecting the right replacement parts, and completing the repair safely and effectively.
Garage door openers typically last 10-15 years, but the internal gears often show signs of wear much sooner, especially with frequent daily use. According to industry experts, approximately 60% of garage door opener repairs involve gear-related issues, making this knowledge essential for any homeowner.
Understanding Your Craftsman 1/2 HP Garage Door Opener
What Type of Gears Does My Craftsman Opener Use?
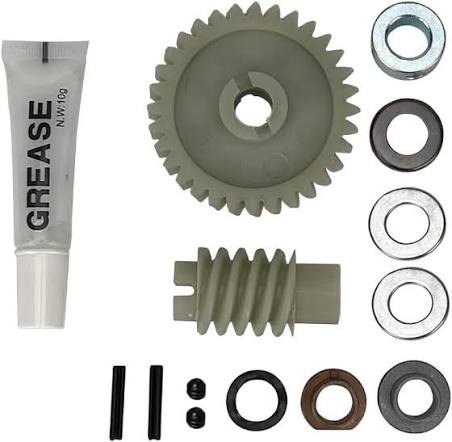
Most Craftsman 1/2 HP garage door openers use a combination of plastic and metal gears in their drive mechanism. The primary gear assembly typically includes:
- Main drive gear: Usually made of nylon or reinforced plastic
- Worm gear: Metal component that transfers power from the motor
- Sprocket gear: Connects to the chain or belt drive system
The plastic gears are designed to be sacrificial components—they wear out before damaging the more expensive motor. This is actually a safety feature, as it prevents catastrophic failure that could damage your entire opener unit.
How Do I Know When Gears Need Replacement?
Identifying worn gears early can prevent complete opener failure. Watch for these common warning signs:
| Symptom | Likely Cause | Urgency Level |
|---|---|---|
| Grinding noise during operation | Worn plastic gears | Medium |
| Opener runs but door doesn’t move | Stripped main gear | High |
| Intermittent operation | Partially worn gears | Medium |
| Complete failure to operate | Severely damaged gears | High |
| Excessive vibration | Misaligned or worn gears | Low-Medium |
According to Wikipedia’s article on garage door openers, modern openers are designed with replaceable gear assemblies specifically to extend the unit’s overall lifespan and reduce repair costs.
Preparing for Gear Replacement
What Tools and Parts Do I Need?
Before starting your Craftsman 1/2 HP garage door opener gear replacement, gather these essential items:
Required Tools:
- Phillips head screwdriver (#2 size)
- Flathead screwdriver
- Socket wrench set (7mm and 8mm sockets)
- Needle-nose pliers
- Work gloves
- Safety glasses
- Flashlight or work light
Replacement Parts:
- Craftsman-compatible gear kit (verify model number)
- Lubricant (silicone-based recommended)
- Clean rags
Safety Equipment:
- Ladder (if needed for access)
- Helper (recommended for safety)
How Do I Identify My Specific Model Number?
Finding the correct replacement parts starts with identifying your exact model. Look for the model number sticker located:
- On the back panel of the motor unit
- Inside the light cover
- On the side of the housing near the mounting bracket
Common Craftsman 1/2 HP models include:
- 139.53636SR2
- 139.53990D
- 139.53991D
- 139.53998
Pro tip: Take a photo of your model number with your phone before starting the repair.
Step-by-Step Gear Replacement Process
Step 1: Safety First – Disconnect Power
Never attempt garage door opener repairs without disconnecting power first. Follow these safety steps:
- Unplug the opener from the electrical outlet
- If hardwired, turn off the circuit breaker
- Disconnect the emergency release cord
- Manually close the garage door completely
Wait at least 5 minutes after disconnecting power to allow any stored energy in the system to dissipate.
Step 2: Remove the Motor Cover
- Locate the screws securing the motor housing cover
- Using your Phillips screwdriver, remove all visible screws
- Carefully lift off the cover, noting any wire connections
- Set aside screws in a small container to prevent loss
Step 3: Access the Gear Assembly
- Identify the gear compartment (usually near the motor)
- Remove any retaining clips or additional screws
- Gently pull out the gear assembly
- Take photos of the current configuration for reference
Step 4: Remove Old Gears
- Note the orientation of each gear before removal
- Use needle-nose pliers to carefully extract worn gears
- Clean the gear housing with a clean rag
- Inspect surrounding components for damage
Step 5: Install New Gears
- Apply a thin layer of silicone lubricant to new gears
- Insert gears in the same orientation as the originals
- Ensure proper meshing between gear teeth
- Double-check alignment before proceeding
Step 6: Reassemble and Test
- Replace the gear assembly in its original position
- Secure all screws and clips
- Reattach the motor cover
- Reconnect power and test operation
Important: Test the opener several times to ensure smooth operation before regular use.
Common Mistakes to Avoid
What Errors Should I Watch Out For?
Even experienced DIYers can make mistakes during gear replacement. Avoid these common pitfalls:
Incorrect Gear Orientation
- Always photograph the original setup
- Mark gear positions with a marker if needed
- Verify tooth alignment before final assembly
Over-tightening Screws
- Use moderate pressure only
- Plastic components can crack easily
- Follow manufacturer torque specifications when available
Skipping Lubrication
- Proper lubrication extends gear life significantly
- Use only recommended lubricants
- Avoid petroleum-based products on plastic gears
Ignoring Root Causes
- Check for underlying issues causing premature wear
- Inspect door balance and spring tension
- Address any misalignment problems
Maintenance Tips for Extended Gear Life
How Can I Prevent Future Gear Problems?
Regular maintenance can significantly extend the life of your replacement gears:
Monthly Checks:
- Listen for unusual noises during operation
- Visual inspection of gear area through housing vents
- Test emergency release function
Quarterly Maintenance:
- Apply fresh lubricant to moving parts
- Check door balance and alignment
- Inspect safety sensors and wiring
Annual Professional Inspection:
- Have a qualified technician examine the entire system
- Replace worn components proactively
- Update safety features as needed
Cost Comparison: DIY vs Professional Repair
Is DIY Gear Replacement Worth It?
Understanding the cost benefits helps justify the DIY approach:
| Service Type | Average Cost | Time Required | Warranty |
|---|---|---|---|
| DIY Gear Replacement | $25-50 (parts only) | 2-3 hours | Parts warranty |
| Professional Repair | $150-300 | Same day | Full service warranty |
| Complete Unit Replacement | $300-500 | 4-6 hours | New unit warranty |
Note: Prices vary by location and specific model requirements.
FAQ Section
Q: How long do replacement gears typically last?
A: Quality replacement gears should last 5-8 years with normal use. Factors affecting longevity include frequency of use, proper lubrication, door balance, and environmental conditions. Regular maintenance can extend this timeframe significantly.
Q: Can I use universal gear kits instead of Craftsman-specific ones?
A: While universal kits may fit physically, we recommend using Craftsman-specific or manufacturer-approved replacement parts. These ensure proper compatibility, maintain warranty coverage, and provide optimal performance. Universal kits may void existing warranties and could lead to premature failure.
Q: What should I do if my opener still doesn’t work after gear replacement?
A: If problems persist after gear replacement, check these areas: motor functionality, limit switch settings, safety sensor alignment, and door balance. The issue might not be gear-related. Consider consulting a professional technician if basic troubleshooting doesn’t resolve the problem.
Q: Are there different types of gears for chain-drive vs belt-drive openers?
A: Yes, chain-drive and belt-drive openers use different gear configurations. Chain-drive models typically have more robust gearing due to higher stress loads, while belt-drive systems use lighter gear assemblies. Always verify your opener type before purchasing replacement parts.
Q: How often should I lubricate my garage door opener gears?
A: Lubricate gears every 6-12 months, or whenever you notice increased noise during operation. Use silicone-based lubricants specifically designed for garage door openers. Avoid over-lubrication, which can attract dirt and debris that accelerate wear.
Q: Is it safe to replace gears myself, or should I hire a professional?
A: Gear replacement is generally safe for homeowners with basic mechanical skills and proper safety precautions. However, if you’re uncomfortable working with electrical components or lack confidence in your abilities, hiring a professional is recommended. Always prioritize safety over cost savings.
Conclusion
Performing a Craftsman 1/2 HP garage door opener gear replacement is a manageable DIY project that can save you significant money while extending the life of your garage door opener. By following this comprehensive guide, you’ve learned how to identify worn gears, select appropriate replacement parts, and complete the repair safely and effectively.
Remember that regular maintenance and prompt attention to warning signs can prevent costly repairs down the road. Share this guide with friends and family who might benefit from this knowledge, and don’t hesitate to reach out to professionals when needed. Your garage door opener will thank you with years of reliable service!
Have you successfully completed a gear replacement? Share your experience in the comments below or on social media using #GarageDoorDIY!
Leave a Reply