Ever opened your garage remote and noticed tiny switches inside—but had no idea what they do? You’re not alone. Understanding What Are Dip Switches On A Garage Door Opener can help you fix connection issues, improve security, and even sync new remotes without calling a technician.
What Are DIP Switches on a Garage Door Opener?
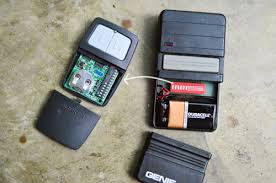
DIP switches (Dual In-line Package switches) are small manual switches located inside older garage door remotes and opener units. They are used to set a unique code that allows the remote to communicate with the garage door opener.
Read too: How Do You Change Code On Garage Door Keypad Fast?
In simple terms, they act like a password—both the remote and the opener must have matching switch positions to work.
📊 Before modern rolling-code technology, millions of garage door systems used DIP switches as their primary security method.
For more technical background, visit:
https://en.wikipedia.org/wiki/DIP_switch
Where Are DIP Switches Located?
You can typically find DIP switches in two main places:
1. Inside the Remote Control
- Remove the battery cover
- Look for a row of tiny switches (usually 8–12 switches)
2. Inside the Garage Door Opener Unit
- Open the motor housing
- Locate the control panel
💡 Tip: The switches are often labeled with numbers (1–12) and marked “ON/OFF”.
How Do DIP Switches Work?
Each switch has two positions:
- ON (up)
- OFF (down)
By combining multiple switches, you create a unique binary code.
Example:
| Switch Number | Position |
|---|---|
| 1 | ON |
| 2 | OFF |
| 3 | ON |
| 4 | OFF |
This combination must be identical in both the remote and the opener.
📊 With 10 switches, you can create up to 1,024 unique combinations, which was considered secure at the time.
Why Are DIP Switches Important?
Key Functions:
- Signal Matching: Ensures only your remote opens your door
- Basic Security: Prevents random signals from triggering the opener
- Manual Control: Allows easy reprogramming without digital tools
DIP Switches vs Modern Rolling Code Technology
Garage technology has evolved significantly. Here’s how DIP switches compare:
| Feature | DIP Switch System | Rolling Code System |
|---|---|---|
| Security | Basic | High (changes every use) |
| Ease of Setup | Manual | Automatic |
| Risk of Hacking | Higher | Very Low |
| Popularity | Older systems | Modern standard |
👉 Modern systems use rolling codes, which change every time you press the remote—making them far more secure.
How To Set DIP Switches (Step-by-Step Guide)
If your remote isn’t working, syncing DIP switches can fix it.
Tools Needed:
- Small screwdriver
- Good lighting
Step 1: Open the Remote
- Remove the battery cover
- Locate the DIP switches
Step 2: Check the Opener Unit
- Open the motor housing
- Find the matching DIP switch panel
Step 3: Match the Switch Positions
Carefully set each switch in the remote to match the opener.
👉 Example:
- If switch #1 on opener is UP → set remote switch #1 to UP
- Repeat for all switches
Step 4: Test the Remote
- Stand within 3–5 meters (10–15 feet)
- Press the remote button
If the door moves, the setup is successful.
Common Problems and Fixes
1. Remote Not Working
Cause: Mismatched DIP switches
Fix: Recheck alignment carefully
2. Intermittent Signal
Cause: Loose switches or battery issue
Fix: Replace battery and secure switches
3. Door Opens Randomly
Cause: Code interference (rare but possible)
Fix: Change DIP switch combination
Advantages vs Disadvantages of DIP Switches
✅ Advantages:
- Simple and easy to understand
- No programming tools required
- Quick manual setup
❌ Disadvantages:
- Limited security
- Easy to duplicate codes
- Outdated technology
Should You Upgrade from DIP Switch Systems?
If you’re still using DIP switches, consider upgrading.
Reasons to Upgrade:
- Better security (rolling code technology)
- Smartphone compatibility
- Reduced interference issues
📊 Security experts recommend upgrading older systems, as fixed-code systems are more vulnerable to signal interception.
Real-World Example
A homeowner reported their garage door opening unexpectedly at night. The issue? A neighbor’s remote had the same DIP switch combination.
After changing the switch pattern, the problem was resolved instantly—highlighting the importance of unique configurations.
Maintenance Tips for DIP Switch Systems
- Check switches every 6–12 months
- Replace remote batteries annually
- Keep switches clean and dust-free
- Avoid frequent unnecessary changes
FAQ: What Are DIP Switches on a Garage Door Opener?
1. Are DIP switches still used today?
They are mostly found in older systems. Modern openers use rolling code technology.
2. How many DIP switches are there?
Typically 8 to 12 switches, depending on the model.
3. Can I change DIP switch settings anytime?
Yes, but you must update both the remote and the opener.
4. Are DIP switches secure?
They offer basic security but are less secure than modern systems.
5. What happens if switches don’t match?
The remote will not communicate with the opener.
6. Can multiple remotes use the same DIP switches?
Yes, as long as all remotes match the opener’s configuration.
Conclusion
Understanding What Are Dip Switches On A Garage Door Opener gives you a clear advantage when troubleshooting, syncing remotes, or improving security. While they may be simple and reliable, they’re also outdated compared to modern systems.
If you found this guide helpful, consider sharing it with friends or family—especially those still using older garage door systems. A small adjustment today can save a lot of frustration tomorrow!
Leave a Reply