Owning a vintage garage door opener can be a challenge, especially when dealing with electrical issues. Many homeowners search for the Screw Drive Old Genie Garage Door Opener Wiring Diagram to understand how to safely repair or replace wiring. This guide provides clear, step-by-step instructions for troubleshooting and reconnecting your old Genie opener.
Understanding the Screw Drive Genie Garage Door Opener
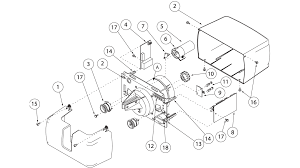
The screw drive mechanism is a simple yet reliable system used in older Genie garage door openers. Unlike chain or belt-driven systems, screw drives require less maintenance but rely heavily on precise wiring for safe operation.
Read too: Tc1 Tricode Garage Door Opener Remote W/ Clip Chamberlain: Complete Guide
Key Components:
- Motor unit
- Limit switch board
- Safety sensors
- Wall control wiring
- Power supply
According to Genie manuals, proper wiring ensures smooth door operation and prevents electrical hazards. Learn more about garage door opener basics on Wikipedia: Garage Door Opener
Why Wiring Diagrams Are Essential
A wiring diagram is more than a technical drawing—it’s a roadmap to repair and safety.
Benefits of Using a Wiring Diagram:
- Identifies correct wire connections
- Reduces risk of short circuits or motor damage
- Ensures sensors and limit switches function properly
- Simplifies troubleshooting for both DIYers and professionals
Expert Tip: Always match wire colors and terminal labels exactly as shown in the diagram to prevent malfunctions.
How To Read The Screw Drive Old Genie Wiring Diagram
Understanding symbols and wire routing is crucial.
Step-by-Step Guide:
- Identify the motor terminals: Usually labeled M1 (black) and M2 (white)
- Locate the limit switch board: Controls door travel up and down
- Check sensor connections: Infrared sensors prevent accidental closure
- Follow color-coded wiring: Red, black, white, green for power and ground
- Note jumper wires or connectors: Used for advanced features like remote control
Tip: Keep a camera handy to document the original setup before disconnecting anything.
Common Wiring Issues in Old Genie Openers
Older units often face wiring wear and tear.
Typical Problems:
- Frayed or broken wires
- Corrosion on terminal contacts
- Incorrect connections after previous repairs
- Sensor misalignment causing door reversal
Statistic: Studies show that over 60% of old opener failures are due to wiring or sensor issues rather than the motor itself.
Step-by-Step Repair and Rewiring
Materials Needed:
- Screwdriver set
- Electrical tape
- Wire stripper/cutter
- Multimeter for voltage testing
Steps:
- Turn off the power at the breaker
- Remove the motor cover to access wiring
- Check for frayed or corroded wires and replace if needed
- Follow the wiring diagram to reconnect motor, sensors, and wall controls
- Secure wires with clips and tape to prevent shorts
- Test the door operation while watching sensor functionality
- Adjust limit switches if door reverses or stops incorrectly
Pro Tip: Use numbered tags on wires to match them with the diagram and avoid mistakes.
Safety Precautions
Safety is paramount when working with old garage door openers.
Always:
- Disconnect power before touching wires
- Wear insulated gloves
- Keep children and pets away
- Avoid bypassing sensors permanently
Expert Insight: Genie recommends testing all safety features after any wiring adjustment.
Troubleshooting Tips
Even after rewiring, issues may persist.
Quick Checks:
- Door reverses: Inspect sensor alignment
- Motor doesn’t run: Check breaker and voltage with multimeter
- Remote fails: Verify wall control wiring and battery in transmitter
- Door stops midway: Adjust limit switches
Maintenance Tips for Longevity
Proper maintenance reduces future wiring problems.
Recommendations:
- Inspect wires annually for wear
- Clean motor terminals to prevent corrosion
- Align sensors and check limit switches every 6 months
- Lubricate screw drive rod with recommended grease
Pro Tip: Keeping a backup wiring diagram on hand saves time in emergencies.
FAQ: Screw Drive Old Genie Garage Door Opener Wiring Diagram
1. Can I replace wires on my old Genie opener myself?
Yes, if you follow the wiring diagram and safety instructions. Use insulated tools and verify power is off before starting.
2. How do I know which wire goes where?
Refer to the labeled wiring diagram. Motor terminals, sensors, and wall controls are color-coded and often labeled on the board.
3. What if my sensors aren’t working after rewiring?
Check alignment and connections. Clean the lenses and ensure the infrared beam is unobstructed.
4. Can I use modern sensors with an old screw drive opener?
Yes, but you may need adapters or follow the manufacturer’s instructions carefully.
5. Where can I find an official Genie wiring diagram?
Check Genie manuals or their official support site. Online PDF archives and trusted repair forums often have older diagrams.
Conclusion
A Screw Drive Old Genie Garage Door Opener Wiring Diagram is essential for safely repairing and maintaining your vintage unit. Following the diagram ensures proper function, extends the lifespan of your opener, and keeps your garage safe. Share this guide with friends or family who are tackling similar repairs—they’ll thank you for it! 🚪
Leave a Reply