Planning a garage build or replacement? Understanding the correct Rough Opening For A 9 X 7 Garage Door is critical to avoid costly mistakes. Even a small measurement error can lead to installation issues, poor alignment, or extra labor. In this guide, you’ll learn the exact dimensions, framing tips, and step-by-step instructions to get it right the first time.
What Is a Rough Opening for a Garage Door?
Before diving into the exact Rough Opening For A 9 X 7 Garage Door, let’s define what “rough opening” means.
Read too: How Do You Change Code On Garage Door Keypad Fast?
A rough opening is the framed space in your wall where the garage door will be installed. It includes:
- The width and height of the opening
- Structural framing (studs and header)
- Clearance for tracks and hardware
👉 This concept is part of general construction framing, as explained in this Wikipedia article on framing (construction).
What Is the Standard Rough Opening For A 9 X 7 Garage Door?
This is the question most people ask first.
Standard Size:
For a 9 ft wide × 7 ft high garage door, the rough opening is typically:
👉 9 feet wide × 7 feet high (108″ x 84″)
Important Note:
Unlike residential entry doors, garage door rough openings are usually the same size as the door itself.
Additional Space Requirements
While the rough opening itself matches the door size, you also need extra space around it:
Side Room (Left & Right):
- Minimum: 3.5–5 inches each side
Headroom (Above Door):
- Standard: 12–15 inches
- Low headroom systems: 8–10 inches
Backroom (Depth of Garage):
- Door height + 18–24 inches
- For 7 ft door: ~9–10 feet total depth
Why Accurate Rough Opening Matters
Getting the Rough Opening For A 9 X 7 Garage Door wrong can cause serious problems.
Potential Issues:
- Door won’t fit properly
- Tracks misaligned
- Gaps causing air leaks
- Extra installation costs
Real Insight:
Contractors often report that incorrect rough openings are one of the top causes of delayed garage door installations.
Step-by-Step: How To Frame a Rough Opening
If you’re building or remodeling, follow this process carefully.
Step 1: Measure the Door Size
Confirm your door dimensions:
- Width: 9 feet (108 inches)
- Height: 7 feet (84 inches)
Step 2: Mark the Opening Area
Using a level and tape measure:
- Mark 108 inches horizontally
- Mark 84 inches vertically
- Ensure lines are straight and square
Step 3: Install King Studs
- Place vertical studs on both sides
- These provide structural support
Step 4: Add Jack Studs
- Install shorter studs inside the king studs
- These will hold the header
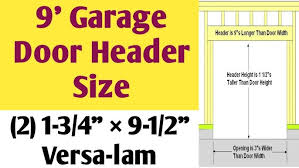
Step 5: Install the Header
The header supports weight above the garage door.
Recommended Header Sizes:
- Single-story: 2×10 or 2×12 lumber
- Double-story: Engineered beam (LVL)
Step 6: Check Level and Alignment
- Use a level to ensure everything is straight
- Measure diagonally to confirm square shape
Step 7: Final Inspection
Before installing the door:
- Verify opening is exactly 9′ x 7′
- Check for obstructions
- Confirm clearance space
Rough Opening vs Finished Opening (Key Differences)
| Feature | Rough Opening | Finished Opening |
|---|---|---|
| Definition | Framed wall space | Visible door opening |
| Size | Same as door | Slightly smaller (trimmed) |
| Includes framing | Yes | No |
| Purpose | Structural installation | Final appearance |
Common Mistakes to Avoid
Even experienced DIYers can make errors.
Avoid These:
- ❌ Making opening too small
- ❌ Ignoring headroom requirements
- ❌ Uneven framing
- ❌ Weak or undersized header
- ❌ Forgetting track clearance
Pro Tips for Perfect Garage Door Framing
1. Always Measure Twice
Small errors can cause big problems.
2. Use a Level and Square
Ensures smooth door operation.
3. Plan for Insulation
If adding insulation, consider thickness.
4. Follow Manufacturer Specs
Different doors may have unique requirements.
Real-World Example
Let’s say you’re installing a standard single-car garage door.
Scenario:
- Door size: 9′ x 7′
- Garage depth: 20 feet
- Ceiling height: 9 feet
Result:
- Rough opening: 9′ x 7′
- Headroom: 12 inches available
- Backroom: sufficient for tracks
👉 This setup allows for smooth installation and operation.
How Much Space Do You Need Around the Opening?
Here’s a quick reference:
| Area | Minimum Space Required |
|---|---|
| Side Room | 3.5–5 inches |
| Headroom | 12–15 inches |
| Backroom | 9–10 feet |
When to Adjust the Rough Opening Size
Sometimes you may need adjustments.
Adjust if:
- You’re installing custom doors
- Using insulation panels
- Adding decorative trim
- Working with uneven walls
Benefits of Proper Rough Opening
Advantages:
- ✅ Smooth door operation
- ✅ Faster installation
- ✅ Better insulation and sealing
- ✅ Longer door lifespan
Disadvantages of Incorrect Opening:
- ❌ Costly repairs
- ❌ Installation delays
- ❌ Poor performance
Step-by-Step Checklist
Use this checklist before installation:
- Measure door size
- Mark opening accurately
- Install studs and header
- Check level and square
- Confirm clearance space
Frequently Asked Questions
FAQ: Rough Opening For A 9 X 7 Garage Door
1. Is the rough opening the same size as the garage door?
Yes, for most garage doors, the rough opening matches the door size exactly.
2. How much headroom is needed for a 7-foot garage door?
Typically 12–15 inches, depending on the track system.
3. Can I make the opening slightly bigger?
It’s not recommended, as it can cause fitting and sealing issues.
4. What happens if the opening is too small?
The door won’t fit, and you’ll need to reframe the opening.
5. Do all garage doors use the same rough opening?
Most standard doors do, but always check manufacturer specs.
6. Can I install a garage door myself?
Yes, but proper framing and measurements are critical for success.
Conclusion
Now you know exactly how to create the perfect Rough Opening For A 9 X 7 Garage Door.
By:
- Using correct dimensions (9′ x 7′)
- Allowing proper clearance
- Following framing best practices
You can ensure a smooth installation and long-lasting performance.
Leave a Reply