If your garage remote suddenly stops working or you’ve just bought a new one, you’re probably wondering how to sync LiftMaster garage door opener with remote quickly and correctly. It can feel frustrating when your garage won’t respond—especially when you’re in a hurry.
The good news? Syncing your LiftMaster remote is easier than you think, and you can do it in just a few minutes with the right steps.
Read too: How Do You Change Code On Garage Door Keypad Fast?
How To Sync LiftMaster Garage Door Opener With Remote (Step-by-Step Guide)
Let’s go straight to the solution. Follow these steps carefully:
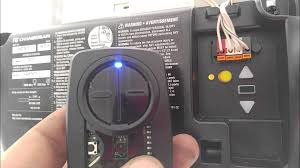
Step 1: Locate the “Learn” Button
- Find your garage door opener motor unit (usually mounted on the ceiling).
- Look for a “Learn” button on the back or side panel.
- The button color may be:
- Yellow
- Purple
- Red/orange
- Green
👉 Tip: The color indicates the frequency and compatibility of your remote.
Step 2: Press the Learn Button
- Press and release the Learn button once.
- A small LED light will turn on.
⏱️ You now have 30 seconds to complete the next step.
Step 3: Press the Remote Button
- Press and hold the button on your remote that you want to program.
- Hold for about 2–3 seconds, then release.
- The opener light will blink or you’ll hear a click.
👉 This confirms successful synchronization.
Step 4: Test the Remote
- Press the remote again.
- The garage door should open or close smoothly.
✅ Done! Your remote is now synced.
What If the LiftMaster Remote Won’t Sync?
Sometimes the process doesn’t work on the first try. Here are common issues and fixes:
1. Out of Range
- Stand within 3–5 feet of the opener when syncing.
2. Dead Battery
- Replace with a fresh battery (usually CR2032 or similar).
3. Memory Full
- LiftMaster openers can store 5–50 remotes, depending on the model.
- Clear memory if needed (explained below).
4. Wrong Remote Type
- Ensure compatibility with your opener’s frequency.
How To Reset LiftMaster Garage Door Opener Memory
If syncing fails, resetting often helps.
Steps to Clear Memory:
- Press and hold the Learn button for 6–10 seconds
- Release when the LED turns off
- All remotes are now erased
⚠️ Note: You’ll need to reprogram all remotes afterward.
Different LiftMaster Learn Button Colors Explained
Understanding your Learn button helps avoid compatibility issues.
| Color | Frequency | Year Range | Compatibility |
|---|---|---|---|
| Yellow | 310/315/390 MHz | Newer models | Security+ 2.0 |
| Purple | 315 MHz | 2005–2014 | Security+ |
| Red/Orange | 390 MHz | 1997–2005 | Older remotes |
| Green | 390 MHz | Pre-1997 | Limited support |
👉 Newer systems use rolling code technology for better security. Learn more about it on Wikipedia:
https://en.wikipedia.org/wiki/Rolling_code
How Many Remotes Can You Sync to One Opener?
Most LiftMaster systems allow multiple remotes.
Typical Limits:
- Standard models: 5–10 remotes
- Advanced models: up to 50 devices
You can also sync:
- Keypads
- Car-integrated systems (HomeLink)
Can You Sync a LiftMaster Remote Without the Learn Button?
Yes—but it depends on your setup.
Option 1: Using a Wall Control Panel
Some modern units allow syncing via the wall console:
- Navigate to settings
- Select “Program”
- Follow on-screen instructions
Option 2: Using an Existing Remote
If you already have a working remote:
- Press and hold both remotes close together
- Hold buttons until LED blinks
- Test the new remote
👉 This method doesn’t work on all models but can save time.
How Long Does It Take to Sync a LiftMaster Remote?
In most cases:
- Setup time: 2–5 minutes
- Reset + reprogram: 5–10 minutes
According to industry estimates, over 80% of garage door remote issues are resolved with simple reprogramming.
Tips for a Smooth Syncing Process
To avoid frustration, follow these best practices:
- ✔️ Always use fresh batteries
- ✔️ Stand close to the opener
- ✔️ Avoid pressing the Learn button multiple times
- ✔️ Program one remote at a time
- ✔️ Keep your manual nearby for model-specific steps
Pros vs Cons of DIY Syncing
Pros
- Fast and easy
- No technician needed
- Saves money
- Works for most models
Cons
- Can be confusing for beginners
- Model variations may differ slightly
- Requires access to motor unit
FAQ: How To Sync LiftMaster Garage Door Opener With Remote
1. Why is my LiftMaster remote not working after syncing?
It could be due to a dead battery, interference, or incorrect programming. Try resetting and reprogramming again.
2. Do I need a professional to sync my remote?
No. Most homeowners can do it themselves in minutes using the Learn button method.
3. Can I program multiple remotes at once?
No. You need to program each remote individually for proper syncing.
4. What does the blinking light mean during syncing?
It indicates successful pairing between the opener and the remote.
5. Will syncing erase old remotes?
No—unless you reset the system by holding the Learn button for 6–10 seconds.
6. Can I sync my car’s built-in remote (HomeLink)?
Yes. Most LiftMaster openers are compatible with HomeLink systems, but additional steps may be required.
Conclusion
Learning how to sync LiftMaster garage door opener with remote is a simple skill that can save you time, money, and frustration. With just a few steps—locating the Learn button, pressing your remote, and testing—you can get your system working again in minutes.
If you run into issues, a quick reset or battery replacement usually solves the problem. And if you’re upgrading your system, understanding compatibility ensures a smoother setup.
Leave a Reply