Struggling to connect your car to your garage door opener? You’re not alone. Many drivers search for how to program garage door opener to car with remote when they want the convenience of opening their garage without a handheld remote. The good news is that most modern vehicles support this feature—and setup usually takes just a few minutes.
How To Program Garage Door Opener To Car With Remote
Programming your garage door opener to your car involves syncing your vehicle’s built-in system (often called HomeLink) with your garage door opener remote.
Read too: How Do You Change Code On Garage Door Keypad Fast?
👉 The exact steps may vary slightly depending on your car and opener model, but the general process is very similar.
What Do You Need Before Programming?
Before you start, gather the following:
Requirements:
- Your garage door opener remote
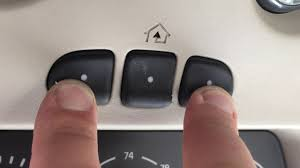
- Your car with built-in buttons (usually on visor or dashboard)
- Access to the garage door opener motor unit
- A ladder (if needed)
Where Are the Garage Door Buttons in Your Car?
Most vehicles have built-in programmable buttons.
Common Locations:
- Overhead console (near interior lights)
- Sun visor
- Rearview mirror
These buttons replace your handheld remote once programmed.
Step-by-Step: How To Program Garage Door Opener To Car With Remote
Follow this proven method:
Step 1: Clear Existing Codes (Important)
Before programming, reset your car’s system.
How:
- Press and hold the two outer buttons
- Hold for 10–20 seconds
- Indicator light will flash
👉 This ensures no previous codes interfere.
Step 2: Pair Car With Remote
- Hold your garage remote 1–3 inches from the car buttons
- Press and hold both:
- Remote button
- Car button
- Wait until the indicator light changes from slow blink to rapid flash
⏱ Time: ~20–30 seconds
Step 3: Sync With Garage Door Opener (Learn Button)
Now connect the car to the opener itself.
- Go to your garage opener motor
- Press the Learn button
- Within 30 seconds, return to your car
- Press the programmed car button 2–3 times
👉 The garage door should move, confirming success.
Step 4: Test the System
- Press your car button
- Ensure the door opens and closes smoothly
What Is the Learn Button and Why It Matters?
The Learn button allows your opener to accept new devices.
Key Functions:
- Connect remotes
- Sync cars
- Reset system
Garage door openers use radio signals and coded systems, as explained in Wikipedia, to securely communicate with remotes and vehicles.
Why Won’t My Garage Door Connect to My Car?
If programming fails, don’t worry—this is common.
Common Reasons:
- Incompatible system (older opener)
- Dead remote battery
- Missed timing window
- Learn button not pressed
Troubleshooting Guide
Quick Fix Checklist:
- ✅ Replace remote batteries
- ✅ Repeat steps carefully
- ✅ Stay within 30 seconds of Learn button press
- ✅ Check vehicle compatibility
Rolling Code vs Fixed Code Systems
Understanding your system helps with programming.
Comparison Table
| Feature | Rolling Code | Fixed Code |
|---|---|---|
| Security | High | Low |
| Compatibility | Newer cars | Older systems |
| Setup | Requires Learn button | Simple pairing |
👉 Most modern openers use rolling code for better security.
Programming Different Garage Door Brands
LiftMaster / Chamberlain:
- Use Learn button
- Follow full 3-step process
Genie:
- Similar process
- May require “Program” button instead
Older Openers:
- May not support car integration
- Require compatibility bridge
How Long Does Programming Take?
- Average time: 2–5 minutes
- First-time setup may take slightly longer
Safety Tips During Programming
- Ensure door area is clear
- Do not stand under moving door
- Use stable ladder if accessing opener
- Keep children away
Pros vs Cons of Programming Garage Door to Car
Advantages
- ✅ No need for handheld remote
- ✅ More convenient access
- ✅ Cleaner car interior
Disadvantages
- ❌ Setup can be confusing
- ❌ Not all systems compatible
- ❌ Requires access to opener
Real-Life Example
A homeowner wanted to eliminate their garage remote clutter. After following the steps above, they successfully programmed their car in under 3 minutes, making daily access faster and easier.
When Should You Call a Professional?
Call an Expert If:
- Programming fails repeatedly
- Opener doesn’t respond
- System is outdated
- Wiring or logic board issues
Typical service cost: $100–$200
Tips for Better Performance
- Keep remote batteries fresh
- Reprogram after power outages
- Avoid interference from nearby devices
- Update opener if older than 10–15 years
FAQ: How To Program Garage Door Opener To Car With Remote
1. Can I program my garage door opener to my car without a remote?
Usually no—you need the original remote for initial pairing.
2. Why does my car button blink but not work?
It may not be synced with the opener’s Learn button yet.
3. How many garage doors can I program?
Most systems allow 2–3 doors.
4. Do all cars support garage door programming?
No, only vehicles with built-in systems like HomeLink.
5. What if my opener is too old?
You may need a compatibility bridge or upgrade.
6. How often do I need to reprogram?
Only when resetting the system or replacing components.
Conclusion
Learning how to program garage door opener to car with remote is a simple way to upgrade your daily convenience. With just a few steps—clearing codes, pairing your remote, and syncing with the Learn button—you can control your garage directly from your car.
This not only saves time but also improves security and ease of use.
Leave a Reply