Thinking about upgrading your garage system and wondering How To Install A Side Mount Garage Door Opener? You’re not alone—these modern openers are becoming increasingly popular for their quiet operation and space-saving design.
In this guide, you’ll learn exactly how to install one step by step, even if you’re a beginner. We’ll also cover tools, costs, and expert tips to ensure a safe and successful installation.
What Is a Side Mount Garage Door Opener?
A side mount (also called a wall-mounted or jackshaft opener) is installed beside the garage door rather than on the ceiling.
Read too: Tc1 Tricode Garage Door Opener Remote W/ Clip Chamberlain: Complete Guide
Key Features:
- Mounted on the wall next to the door
- Uses torsion bar to lift the door
- Frees up ceiling space
- Quieter than traditional chain-drive systems
📊 Industry Insight: Side mount openers are growing in popularity, especially in modern homes, due to their compact design and low noise levels.
How To Install A Side Mount Garage Door Opener (Step-by-Step)
Let’s walk through the full installation process.
⚠️ Safety First: Garage doors use high-tension springs. If you’re unsure, consult a professional.
Tools and Materials Needed
Before starting, gather:
- Power drill
- Socket wrench set
- Level tool
- Tape measure
- Ladder
- Safety gloves
- Side mount opener kit
Step 1: Check Garage Door Compatibility
Not all doors support side mount openers.
✔️ Requirements:
- Torsion spring system (not extension springs)
- Minimum side clearance (8–12 inches recommended)
- Properly balanced door
💡 Test balance: Lift the door halfway—it should stay in place.
Step 2: Disconnect Existing Opener
If you have a ceiling-mounted opener:
- Unplug the power
- Pull emergency release cord
- Remove mounting brackets
✔️ This ensures a clean installation.
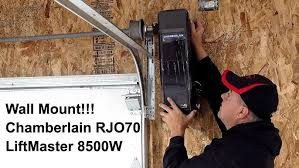
Step 3: Install the Mounting Bracket
Attach the bracket to the wall beside the garage door.
Instructions:
- Position it near the torsion bar
- Use a level for accuracy
- Secure with heavy-duty screws
Step 4: Attach the Opener to the Torsion Bar
This is the most critical step.
- Slide the opener onto the torsion bar
- Align it with the bracket
- Tighten set screws firmly
💡 Make sure there is no wobble—alignment is key for smooth operation.
Step 5: Install the Safety Sensors
Place sensors on both sides of the door:
- Height: 4–6 inches above the floor
- Distance: directly facing each other
✔️ Secure wiring neatly along the wall.
Step 6: Connect Power and Control Panel
- Plug in the opener
- Install wall control unit (about 5 feet above ground)
- Connect wiring according to manual
Step 7: Program the Opener
- Press the “Learn” button
- Sync remote control
- Test opening and closing
✔️ Ensure smooth and quiet operation.
Step 8: Test Safety Features
Important safety checks:
- Auto-reverse function
- Sensor alignment
- Manual release operation
How Long Does Installation Take?
Estimated Time:
- DIY installation: 2–4 hours
- Professional installation: 1–2 hours
💡 First-time installers should allow extra time for adjustments.
How Much Does It Cost to Install a Side Mount Opener?
Average Costs:
| Item | Cost |
|---|---|
| Side mount opener | $300 – $700 |
| Installation (DIY) | Free |
| Professional labor | $150 – $400 |
📊 Tip: Investing in professional installation can reduce long-term repair costs.
Advantages vs Disadvantages of Side Mount Openers
✅ Advantages
- Saves ceiling space
- Ultra-quiet operation
- Sleek modern design
- Ideal for high ceilings
❌ Disadvantages
- Higher upfront cost
- Requires torsion system
- Installation can be complex
Common Mistakes to Avoid
Avoid these pitfalls during installation:
- ❌ Installing on an unbalanced door
- ❌ Misaligning the opener
- ❌ Ignoring safety sensors
- ❌ Overtightening or loosening bolts
Do You Need a Professional Installer?
DIY Is Best If:
- You have basic tools
- You’re comfortable with mechanical work
Hire a Pro If:
- You’re unsure about torsion springs
- The door is heavy or oversized
- You want guaranteed safety
Maintenance Tips After Installation
Keep your opener running smoothly:
- Lubricate moving parts every 6 months
- Check sensor alignment monthly
- Tighten bolts periodically
- Test safety features regularly
📊 Fact: Regular maintenance can extend opener lifespan by up to 30–40%.
How Side Mount Openers Work
Side mount openers operate by turning the torsion bar directly, lifting the door without a rail system.
For a deeper technical explanation, visit:
https://en.wikipedia.org/wiki/Garage_door_opener
FAQ: How To Install A Side Mount Garage Door Opener
1. Can I install a side mount opener myself?
Yes, but only if your garage door meets compatibility requirements and you follow safety precautions.
2. Do side mount openers work on all garage doors?
No, they require a torsion spring system.
3. Are side mount openers better than ceiling-mounted ones?
They are quieter and save space, but cost more upfront.
4. How much space do I need for installation?
Typically 8–12 inches of side clearance.
5. What happens if the power goes out?
Most models include a manual release or battery backup.
6. Are side mount openers safe?
Yes, when installed correctly with proper safety sensors.
Conclusion
Now you know exactly How To Install A Side Mount Garage Door Opener step by step. With the right tools, preparation, and attention to detail, you can successfully upgrade your garage system.
This modern solution offers quiet performance, better space utilization, and improved convenience—making it a smart investment for many homeowners.
👉 If you found this guide helpful, share it on social media to help others upgrade their garage the right way!
Leave a Reply