If you’re searching for “How To Install A Keypad For A Garage Door”, you’re probably looking for a more convenient and secure way to access your garage. A keypad allows you to open your garage without a remote or key—perfect for families and busy homeowners.
The best part? Installing a garage door keypad is a simple DIY project that usually takes less than 30 minutes.
How To Install A Keypad For A Garage Door (Step-by-Step Guide)
Installing a garage door keypad involves two main steps: mounting the keypad and programming it.
Read too: Tc1 Tricode Garage Door Opener Remote W/ Clip Chamberlain: Complete Guide
Tools and Materials You’ll Need
Before starting, gather the following:
- Wireless garage door keypad
- Drill or screwdriver
- Screws (usually included)
- Step ladder
- Measuring tape
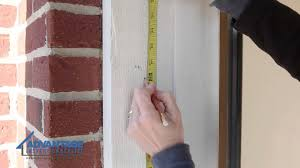
Step 1: Choose the Right Location
The keypad should be placed where it’s easy to access but still secure.
Ideal Placement:
- On the wall beside the garage door
- At a height of 1.5–1.7 meters (5–5.5 feet)
- Away from direct rain or sunlight
👉 Make sure it’s within range of your garage door opener.
Step 2: Mount the Keypad
- Hold the keypad against the wall
- Mark the screw holes
- Drill pilot holes (if needed)
- Attach the keypad using screws
- Snap the cover into place
Pro Tip:
Use a level tool to ensure the keypad is straight.
Step 3: Install or Check Batteries
Most keypads are battery-powered.
- Insert fresh batteries (usually 9V or AA)
- Ensure correct polarity (+/-)
- Close the battery compartment securely
Step 4: Locate the Learn Button on the Opener
To connect the keypad, you’ll need access to the Learn button on your garage door opener.
Where to find it:
- On the motor unit mounted on the ceiling
- Under the light cover
- Near the antenna wire
Step 5: Program the Keypad
- Press the Learn button on the opener
- Wait for the LED light to turn on
- Enter your desired 4-digit PIN on the keypad
- Press the Enter button
- Wait for the garage light to blink
👉 This confirms successful programming.
Step 6: Test the Keypad
- Enter your PIN
- Press Enter
- The garage door should open or close
If it doesn’t work, repeat the programming process.
How Does a Garage Door Keypad Work?
A garage keypad communicates wirelessly with your opener using radio signals.
Simple Explanation:
- You enter a PIN
- The keypad sends a coded signal
- The opener verifies and activates
Modern systems use rolling code technology, which changes the signal each time for better security.
For more technical details, visit:
https://en.wikipedia.org/wiki/Garage_door_opener
Common Installation Mistakes (And How to Avoid Them)
Even simple installations can go wrong.
Mistakes to Watch Out For:
- Mounting too far from the opener
- Using weak or old batteries
- Incorrect PIN setup
- Not pressing Enter after PIN
Quick Fix Table
| Problem | Cause | Solution |
|---|---|---|
| Keypad not responding | Dead battery | Replace battery |
| Door doesn’t open | Programming error | Reprogram keypad |
| Weak signal | Too far from opener | Move closer or reposition |
| Intermittent operation | Signal interference | Reset and retry |
Advantages vs Disadvantages of Garage Door Keypads
Advantages:
- Keyless entry (no remote needed)
- Easy access for family members
- Increased convenience
- Works during power outages (with battery backup)
Disadvantages:
- Requires battery maintenance
- PIN can be forgotten
- Needs occasional reprogramming
How to Choose the Right Garage Door Keypad
Not all keypads are the same.
Key Factors:
- Compatibility with your opener brand
- Weather resistance (IP rating)
- Backlit keypad for night use
- Rolling code security
Compatibility Tip:
Always check if your keypad supports your opener’s frequency and technology.
How to Reset a Garage Door Keypad
Resetting is useful if you forget your PIN or experience issues.
Steps:
- Press and hold the reset button
- Wait 10–15 seconds
- Release when the light flashes
- Reprogram with a new PIN
Security Tips for Garage Door Keypads
Security is just as important as convenience.
Best Practices:
- Use a unique 4-digit PIN
- Avoid common codes like “1234”
- Change your PIN every 3–6 months
- Don’t share your code publicly
Expert Insight:
Home security studies show that simple PIN codes are one of the most common vulnerabilities in residential systems.
DIY Installation vs Professional Help
DIY Benefits:
- Saves money
- Quick setup
- Easy for beginners
When to Call a Professional:
- Compatibility issues
- Wiring problems
- Opener not responding
Typical installation cost: $100–$200.
Maintenance Tips for Long-Term Performance
Keep your keypad working smoothly:
- Replace batteries every 12 months
- Clean keypad surface regularly
- Test functionality monthly
- Check mounting screws periodically
👉 Regular maintenance can extend lifespan by up to 50%.
FAQ: How To Install A Keypad For A Garage Door
Q1: How long does it take to install a garage door keypad?
Usually 20–30 minutes, including programming.
Q2: Can I install a keypad without a Learn button?
Most modern systems require it. Older models may use DIP switches.
Q3: What type of battery does a keypad use?
Typically 9V or AA batteries, depending on the model.
Q4: Why is my keypad not working after installation?
It may need reprogramming or a battery replacement.
Q5: Can I use multiple keypads with one opener?
Yes, most systems support multiple devices.
Q6: Is a garage door keypad secure?
Yes, especially with rolling code technology and a strong PIN.
Conclusion
Installing a keypad is one of the easiest ways to upgrade your garage door system. By following this guide on How To Install A Keypad For A Garage Door, you can complete the setup quickly and enjoy secure, keyless access every day.
From mounting the keypad to programming your PIN, each step is simple and beginner-friendly. With proper maintenance and smart security habits, your keypad will provide convenience and peace of mind for years to come.
If you found this guide helpful, feel free to share it on social media so others can install their garage door keypad with confidence!
Leave a Reply