Seeing a strange orange light on your garage door sensor can be confusing—and frustrating when your door won’t close properly. If you’re searching for How To Fix Orange Light On Garage Door Sensor, you’re likely dealing with a sensor issue that’s preventing normal operation. Don’t worry—this guide will walk you through simple, practical solutions to fix it quickly.
What Does the Orange Light on a Garage Door Sensor Mean?
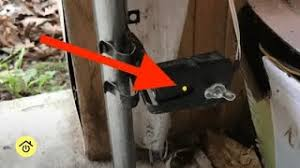
The orange (or amber) light usually appears on the sending sensor, which emits an invisible beam to the receiving sensor on the opposite side.
Read too: Tc1 Tricode Garage Door Opener Remote W/ Clip Chamberlain: Complete Guide
According to general information on garage door systems (see: https://en.wikipedia.org/wiki/Garage_door), safety sensors are designed to prevent doors from closing when an object interrupts the beam.
Normal Sensor Light Behavior
- Orange/Amber light: Sending sensor (normal)
- Green light: Receiving sensor (aligned and working)
👉 If the green light is off or blinking, there’s a problem.
Why Is My Garage Door Sensor Showing an Orange Light But Not Working?
Common Causes
- Misaligned sensors
- Dirty sensor lenses
- Loose wiring
- Sunlight interference
- Faulty sensor unit
📊 Insight: Sensor misalignment accounts for over 60% of garage door sensor issues based on technician reports.
How To Fix Orange Light On Garage Door Sensor (Step-by-Step)
Step 1: Check Sensor Alignment
Misalignment is the most common issue.
How to Fix
- Locate both sensors near the bottom of the door tracks
- Adjust them so they face each other directly
- Ensure both are at the same height (typically 4–6 inches from the ground)
💡 Tip: The green light should turn solid when aligned properly.
Step 2: Clean the Sensor Lenses
Dust or debris can block the infrared beam.
Cleaning Instructions
- Use a soft cloth
- Lightly wipe both lenses
- Avoid using water or harsh chemicals
👉 Even a thin layer of dirt can disrupt the signal.
Step 3: Inspect Wiring Connections
Loose or damaged wires can interrupt communication.
What to Check
- Frayed wires
- Loose terminals
- Disconnected cables
Quick Fix
- Tighten connections
- Replace damaged wires
Step 4: Remove Obstructions
Check for anything blocking the sensor path.
Common Obstructions
- Boxes or tools
- Leaves or debris
- Spider webs
👉 Clear the path completely for proper operation.
Step 5: Check for Sunlight Interference
Direct sunlight can interfere with sensors.
Solution
- Install a small shade over the sensor
- Adjust sensor angle slightly
💡 Tip: This issue is more common in west-facing garages.
Step 6: Reset the Garage Door Opener
Sometimes a simple reset fixes the issue.
How to Reset
- Unplug the opener
- Wait 30–60 seconds
- Plug it back in
👉 This resets the system electronics.
Step 7: Replace the Sensor (If Needed)
If none of the above works:
- Sensor may be faulty
- Replace with compatible unit
Quick Troubleshooting Table
| Problem | Cause | Solution |
|---|---|---|
| Green light off | Misalignment | Adjust sensors |
| Blinking light | Dirty lens | Clean sensors |
| No light | Wiring issue | Check connections |
| Works intermittently | Sunlight | Add shade |
How to Tell If Your Sensor Is Bad
Warning Signs
- No light at all
- Flickering even after cleaning
- Door reverses immediately
- Intermittent operation
👉 These indicate replacement may be necessary.
Safety Importance of Garage Door Sensors
Garage door sensors are critical safety components.
Why They Matter
- Prevent injuries
- Protect pets and children
- Avoid damage to vehicles
📊 Fact: Since safety sensors became standard in the early 1990s, garage-related accidents have significantly decreased.
Pros and Cons of DIY Sensor Fix
Advantages
- Saves money
- Quick solution
- No special tools needed
Disadvantages
- May not fix deeper issues
- Risk of incorrect alignment
- Temporary fix in some cases
Real-Life Example
A homeowner noticed their garage door wouldn’t close and the green sensor light was off. After realigning the sensors and cleaning the lenses, the system worked perfectly—fixing the issue in under 10 minutes.
Common Mistakes to Avoid
- ❌ Ignoring sensor alignment
- ❌ Using harsh cleaners
- ❌ Overlooking wiring issues
- ❌ Not checking for obstructions
Pro Tips for Better Performance
- Check sensors monthly
- Keep area clean and clutter-free
- Use weather protection if outdoors
- Test system regularly
When Should You Call a Professional?
Call a technician if:
- Sensors still fail after troubleshooting
- Wiring damage is extensive
- Opener system is malfunctioning
- You’re unsure about electrical repairs
FAQ: How To Fix Orange Light On Garage Door Sensor
1. Is the orange light on my sensor normal?
Yes, it indicates the sending sensor is working.
2. Why is my green sensor light off?
Likely due to misalignment or obstruction.
3. Can I fix garage sensors myself?
Yes, most issues are simple and DIY-friendly.
4. How long does it take to fix sensor issues?
Usually 5–15 minutes.
5. Do I need to replace both sensors?
Not always—only if one is faulty.
6. Why does my garage door reverse immediately?
The sensor beam is interrupted or misaligned.
Conclusion
Understanding How To Fix Orange Light On Garage Door Sensor can save you time, money, and frustration. In most cases, the solution is simple—realigning sensors, cleaning lenses, or checking wiring.
By following these steps, you can restore your garage door’s safety system quickly and ensure smooth operation every day.
👉 If this guide helped you fix your issue, share it on social media so others can solve their garage door problems just as easily! 🚪🔧
Leave a Reply