If you’re searching for How To Connect LiftMaster Garage Door Opener To WiFi, chances are you want the convenience of controlling your garage door from anywhere—but you’re stuck in the setup process. You’re not alone. Many homeowners struggle with connection errors, confusing app steps, or WiFi compatibility issues.
The good news? Once you understand the process, connecting your LiftMaster opener is surprisingly simple—and this guide will walk you through it step by step.
What Do You Need Before Connecting Your LiftMaster to WiFi?
Before jumping into the setup, preparation is key. Skipping this step often leads to connection failure.
Read too: Tc1 Tricode Garage Door Opener Remote W/ Clip Chamberlain: Complete Guide
Essential Requirements
Make sure you have the following:
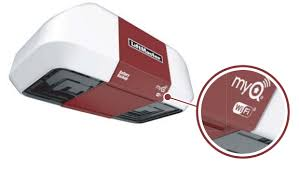
- LiftMaster garage door opener with built-in WiFi (MyQ enabled)
- Smartphone (iOS or Android)
- MyQ app installed
- Home WiFi network (2.4 GHz only)
- WiFi password
- Strong signal near the garage
Why LiftMaster Uses 2.4 GHz Instead of 5 GHz
One of the most common reasons setup fails is using the wrong WiFi band.
- 2.4 GHz: Longer range, better for smart devices
- 5 GHz: Faster speed, but shorter range
Smart devices like garage door openers prioritize stability over speed.
👉 According to Wikipedia, 2.4 GHz networks provide wider coverage and better wall penetration, making them ideal for IoT devices:
https://en.wikipedia.org/wiki/Wi-Fi
How To Connect LiftMaster Garage Door Opener To WiFi (Step-by-Step Guide)
This is the core section. Follow carefully to avoid mistakes.
Step 1: Download and Set Up the MyQ App
- Go to the App Store or Google Play
- Search for MyQ
- Install the app
- Open and create an account
📌 Tip: Use an active email—you’ll need verification.
Step 2: Locate the Learn Button on Your Opener
The Learn button is essential for pairing.
- Usually found on the motor unit (ceiling-mounted)
- Colors may include:
- Yellow
- Purple
- Red
- Green
👉 Press and release the button once.
Result: LED light starts blinking → device is in pairing mode.
Step 3: Add Device in the MyQ App
- Tap “+ Add Device”
- Select Garage Door Opener
- Follow on-screen instructions
The app will now search for your device.
Step 4: Connect to the MyQ Network
- Your phone will detect a temporary network:
- Example: MyQ-123
- Go to WiFi settings
- Connect to that network
📌 This is a temporary connection between your phone and the opener.
Step 5: Enter Your Home WiFi Credentials
- Return to MyQ app
- Select your home network
- Enter password carefully
⚠️ Common mistake: typing wrong password or choosing wrong network.
Step 6: Complete the Connection
- Wait for confirmation
- Lights may blink or click
- App shows “Device Connected”
✅ Done! Your LiftMaster is now connected to WiFi.
How Long Does the Setup Take?
Here’s a realistic expectation:
| Scenario | Time |
|---|---|
| Smooth setup | 5–10 minutes |
| Minor issues | 10–15 minutes |
| Troubleshooting needed | 15–25 minutes |
Common Problems and How to Fix Them
Even if you follow the steps, issues can still occur.
Troubleshooting Guide
| Problem | Cause | Solution |
|---|---|---|
| Cannot find device | Not in pairing mode | Press Learn button again |
| WiFi not visible | Using 5 GHz | Switch to 2.4 GHz |
| Setup fails midway | Weak signal | Move router closer |
| Device offline | Router restart | Reconnect device |
| App crashes | Outdated app | Update MyQ |
Advanced Troubleshooting Tips (Pro Level)
If basic fixes don’t work, try these:
1. Separate WiFi Bands
- Log into router settings
- Create separate SSIDs:
- Home_2.4GHz
- Home_5GHz
2. Reduce Network Interference
- Move router away from:
- Microwaves
- Thick walls
- Metal surfaces
3. Restart Everything
- Turn off:
- Router (30 seconds)
- Garage opener
- Turn back on
Benefits of Connecting LiftMaster to WiFi
Why go through all this effort? Because the benefits are significant.
Key Advantages
1. Remote Access
Open or close your garage from anywhere using your phone.
2. Real-Time Alerts
Receive notifications instantly when your garage opens.
3. Improved Security
Know if someone enters your garage unexpectedly.
4. Smart Home Integration
Works with systems like:
- Google Assistant
- Amazon Alexa
- Apple HomeKit (with bridge)
Pros vs Cons of WiFi Garage Openers
Pros
- Convenient control
- Enhanced safety
- Smart automation
Cons
- Requires internet
- Setup can be tricky for beginners
Smart Home Trend: Why WiFi Garage Openers Are Growing
Smart homes are no longer a luxury—they’re becoming standard.
According to industry reports:
- Over 60% of US homes now use smart devices
- Security devices are among the fastest-growing category
Garage openers are a key part of this trend because they combine:
- Convenience
- Safety
- Automation
Best Practices for a Stable Connection
To avoid future issues, follow these tips.
Router Placement
- Keep within 30–50 feet
- Avoid corners or basements
Network Optimization
- Use dedicated 2.4 GHz band
- Avoid overloaded networks
Device Maintenance
- Update MyQ app regularly
- Check firmware updates
- Restart periodically
How to Reset LiftMaster WiFi Settings
If all else fails, reset and start fresh.
Reset Steps
- Press and hold Learn button for 6–10 seconds
- LED turns off
- WiFi settings cleared
- Restart setup process
FAQ: How To Connect LiftMaster Garage Door Opener To WiFi
1. Why won’t my LiftMaster connect to WiFi?
The most common reason is using a 5 GHz network. Switch to 2.4 GHz and try again.
2. Do I need the MyQ app?
Yes. The MyQ app is required for setup and remote control functionality.
3. Can I connect more than one garage door?
Yes, the MyQ app supports multiple devices in one account.
4. How do I know if my opener supports WiFi?
Look for:
- MyQ logo
- Built-in WiFi indicator
5. What should I do if my device shows offline?
Restart your router and reconnect the device via the MyQ app.
6. Is connecting my garage door to WiFi safe?
Yes, as long as:
- You use strong passwords
- Your network is secured (WPA2/WPA3)
Conclusion
Now you have a complete understanding of How To Connect LiftMaster Garage Door Opener To WiFi—from preparation to troubleshooting and optimization.
By following this guide, you can:
- Set up your device in minutes
- Avoid common mistakes
- Enjoy full smart control of your garage
A connected garage door means better security, more convenience, and smarter living.
If you found this guide helpful, share it on social media so others can easily set up their LiftMaster devices too!
Leave a Reply