If your garage door remote suddenly stops working or becomes unreliable, the issue is often as simple as a dead battery. Knowing how to change battery in LiftMaster garage door opener remote can save you time, frustration, and even the cost of unnecessary repairs.
The good news? This is a quick and beginner-friendly fix that typically takes less than 5 minutes.
Read too: How Do You Change Code On Garage Door Keypad Fast?
Why Is Your LiftMaster Remote Not Working?
Before jumping into the solution, it’s important to confirm that the battery is actually the problem.
Common Signs of a Dead Remote Battery
- Reduced range (you must stand very close to the door)
- Intermittent response
- No LED light when pressing buttons
- Complete failure to operate the door
According to industry data, over 60% of garage remote issues are battery-related, making this the most common and easiest fix.
What Battery Does a LiftMaster Remote Use?
Different LiftMaster remotes use different battery types. Here’s a quick reference table:
| Remote Model Type | Common Battery Type | Voltage |
|---|---|---|
| Standard Remote | CR2032 | 3V |
| Older Models | 9V Battery | 9V |
| Mini Remotes | CR2016 | 3V |
💡 Tip: Always check the back of your remote or inside the battery compartment to confirm the exact battery type.
How To Change Battery In LiftMaster Garage Door Opener Remote (Step-by-Step)
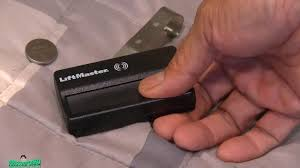
Step 1: Locate the Battery Compartment
Turn your remote over and look for:
- A small sliding cover, OR
- A screw-secured panel
Most modern LiftMaster remotes have a snap-open back cover.
Step 2: Open the Remote Case
Use one of the following tools:
- Flathead screwdriver
- Coin (like a quarter)
Gently pry open the casing. Be careful not to apply too much force to avoid damaging the plastic.
Step 3: Remove the Old Battery
Take out the old battery carefully.
🔍 Pay attention to:
- Battery orientation (+ and – sides)
- Placement direction
Step 4: Insert the New Battery
Place the new battery in the same orientation.
✔ Example:
- For CR2032 batteries, the positive (+) side usually faces up
Step 5: Reassemble the Remote
Snap the casing back together or tighten the screw if applicable.
Step 6: Test the Remote
Stand a few feet away and press the button:
- LED should light up
- Garage door should respond instantly
How Often Should You Replace the Battery?
On average:
- Every 1–2 years for regular use
- Sooner if used multiple times daily
Battery life depends on:
- Frequency of use
- Temperature conditions (cold weather drains batteries faster)
Tips to Extend Your Remote Battery Life
Do’s
- Store the remote in moderate temperatures
- Replace batteries in pairs if applicable
- Use high-quality lithium batteries
Don’ts
- Don’t mix old and new batteries
- Avoid exposing the remote to moisture
- Don’t press buttons unnecessarily
Troubleshooting: What If It Still Doesn’t Work?
If changing the battery doesn’t fix the issue, consider these possibilities:
1. Remote Needs Reprogramming
Sometimes the remote loses its connection.
👉 Solution:
- Press the “Learn” button on the garage opener
- Re-sync your remote
2. Damaged Remote
If the remote was dropped or exposed to water, internal components may be faulty.
3. Signal Interference
Devices like Wi-Fi routers or LED bulbs can interfere with signals.
4. Garage Door Opener Issue
The problem may be with the opener itself, not the remote.
For deeper technical understanding, you can refer to this authoritative resource:
👉 https://en.wikipedia.org/wiki/Garage_door_opener
Battery Replacement: Pros vs Cons
Advantages
✔ Quick and inexpensive fix
✔ No professional help required
✔ Improves remote performance instantly
Disadvantages
✖ Temporary solution if remote is damaged
✖ Requires correct battery type
✖ May not fix deeper technical issues
Expert Insight
Garage door technicians emphasize that regular maintenance—including battery replacement—can extend remote lifespan by up to 30%.
A small step like replacing a battery can prevent larger issues down the line, especially in automated home systems.
FAQ: LiftMaster Remote Battery Replacement
1. How do I know which battery my LiftMaster remote uses?
Check inside the battery compartment or refer to your remote model number. Most use CR2032 or CR2016 coin batteries.
2. Can I use any brand of battery?
Yes, but it’s recommended to use reputable brands like Duracell or Energizer for longer life and reliability.
3. Do I need to reprogram my remote after changing the battery?
Usually no. However, if the remote stops syncing, you may need to reprogram it using the opener’s “Learn” button.
4. Why is my remote still not working after replacing the battery?
Possible reasons include:
- Incorrect battery installation
- Faulty remote
- Signal interference
5. Is it safe to open the remote myself?
Yes. LiftMaster remotes are designed for easy battery replacement. Just avoid using excessive force.
6. How long does it take to change the battery?
Typically 2–5 minutes, even for beginners.
Conclusion
Learning how to change battery in LiftMaster garage door opener remote is one of the simplest yet most effective maintenance tasks you can do. It’s fast, affordable, and often resolves the issue instantly.
By following the step-by-step guide above, you can restore your remote’s functionality without needing professional help.
If you found this guide helpful, consider sharing it with friends or family—someone else might be struggling with the same issue!
Leave a Reply