If your garage door won’t close or keeps reversing unexpectedly, misaligned sensors are often the cause. Many homeowners struggle with this issue, but the good news is that fixing it is simpler than it seems. In this guide, you’ll learn How To Align The Sensors On A Garage Door quickly and safely—even if you’re a complete beginner.
How To Align The Sensors On A Garage Door (Quick Answer)
To align garage door sensors:
- Locate both sensors near the bottom of the door tracks
- Loosen the mounting brackets slightly
- Adjust sensors until both LED lights are steady (not blinking)
- Tighten brackets securely
- Test the door operation
Read too: How Do You Change Code On Garage Door Keypad Fast?
When properly aligned, the sensors create an invisible beam that allows the door to close safely.
What Do Garage Door Sensors Actually Do?
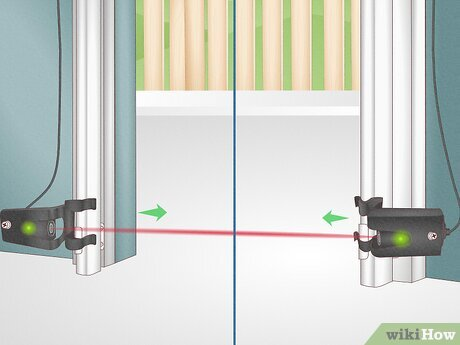
Garage door sensors are part of your home’s safety system. They use an infrared beam to detect objects in the door’s path.
- One sensor sends a beam
- The other receives it
- If the beam is interrupted, the door stops or reverses
This system became standard after safety regulations were introduced in the 1990s to prevent injuries.
For a deeper technical explanation of how automated door systems function, you can refer to this resource on Wikipedia.
Why Are My Garage Door Sensors Misaligned?
Understanding the cause helps prevent future issues.
Common Reasons
- Accidental bumps (car, trash cans, kids)
- Loose brackets over time
- Vibrations from daily use
- Dirt or debris blocking the lens
- Temperature changes causing slight shifts
Quick Insight
Studies in home maintenance show that over 60% of garage door issues are related to sensor misalignment or obstruction—making this one of the most common fixes.
Signs Your Garage Door Sensors Need Alignment
Look for these clear warning signs:
- Door won’t close fully
- Door reverses immediately
- Blinking sensor lights
- One LED off completely
- Door only closes when holding the wall button
Step-by-Step: How To Align Garage Door Sensors
Here’s a detailed, beginner-friendly process.
Tools You’ll Need
- Screwdriver (Phillips or flathead)
- Clean cloth
- Level tool (optional but helpful)
Step 1: Turn Off Power (Safety First)
Disconnect the garage door opener to avoid accidental movement.
Step 2: Locate the Sensors
- Found 4–6 inches above the ground
- Mounted on both sides of the garage door frame
Step 3: Clean the Sensor Lenses
Before adjusting:
- Use a dry or slightly damp cloth
- Remove dust, cobwebs, or dirt
Even small debris can block the beam.
Step 4: Check LED Lights
- Green light: Receiving signal
- Amber/red light: Sending signal
If one or both are blinking, alignment is off.
Step 5: Loosen the Mounting Brackets
- Use a screwdriver to loosen screws slightly
- Do not remove completely
This allows movement for alignment.
Step 6: Adjust the Sensors
- Gently move sensors until both lights are steady
- Ensure they face each other directly
- Use a level tool for precision if needed
Step 7: Tighten and Secure
- Tighten screws carefully
- Avoid shifting sensors while tightening
Step 8: Test the Garage Door
- Restore power
- Close the door using the remote
- Ensure smooth operation without interruption
Alignment Tips for Perfect Results
Pro Tips
- Measure height on both sides (should match within 1/8 inch)
- Keep sensors 4–6 inches above floor level
- Avoid direct sunlight hitting sensors
- Use string line method for perfect alignment
Common Mistakes to Avoid
Even simple fixes can go wrong.
Mistakes
- ❌ Skipping cleaning step
- ❌ Over-tightening brackets
- ❌ Ignoring wiring issues
- ❌ Aligning visually without checking LEDs
Advantages vs Disadvantages of DIY Sensor Alignment
Pros
- ✔ Saves money (no technician needed)
- ✔ Quick fix (10–20 minutes)
- ✔ Improves safety immediately
Cons
- ✘ Requires careful adjustment
- ✘ May not fix deeper electrical issues
- ✘ Trial-and-error for beginners
How Long Does It Take to Align Garage Sensors?
- Beginner: 15–30 minutes
- Experienced user: 5–10 minutes
It’s one of the fastest garage door fixes you can do yourself.
When Should You Replace Instead of Align?
Sometimes alignment isn’t enough.
Replace Sensors If:
- No LED lights at all
- Wires are damaged
- Sensors are cracked or broken
- Persistent issues after multiple adjustments
Real-Life Example
A homeowner reported their garage door wouldn’t close unless holding the wall button. After inspecting:
- One sensor was slightly tilted
- Adjustment took 12 minutes
- Problem solved instantly
This shows how small misalignments can cause major inconvenience.
Maintenance Tips to Prevent Future Misalignment
Keep your sensors working longer with these habits:
- Clean lenses every 2–3 months
- Check alignment during seasonal changes
- Avoid hitting sensor area with objects
- Inspect brackets for looseness
FAQ: How To Align The Sensors On A Garage Door
1. Why is one sensor light off completely?
This usually indicates a power issue or disconnected wire, not just misalignment.
2. Can sunlight affect garage door sensors?
Yes. Direct sunlight can interfere with the beam. Adjust angle or add shade if needed.
3. Do both sensors need to be aligned perfectly?
Yes. Even slight misalignment can break the infrared beam.
4. Why does my garage door close only when I hold the button?
This bypasses the safety system, indicating sensor misalignment or blockage.
5. How far apart should the sensors be?
They should face each other directly across the door opening, typically 10–20 feet apart depending on garage width.
6. Can I align sensors without tools?
You can adjust by hand, but a screwdriver is recommended for secure positioning.
Conclusion
Learning How To Align The Sensors On A Garage Door is a simple yet powerful way to fix one of the most common garage door problems. With just a few tools and about 15 minutes, you can restore your door’s safety and functionality.
By keeping sensors clean, properly aligned, and regularly maintained, you’ll avoid unnecessary repairs and ensure smooth operation for years to come.
If this guide helped you solve your problem, feel free to share it on social media so others can fix their garage doors quickly and safely too!
Leave a Reply