Is your garage door not closing fully or stopping abruptly? You might need to learn how to adjust travel limits on Chamberlain garage door. Incorrect travel limit settings can create safety risks, strain the motor, or leave your home unsecured. Don’t worry—this detailed guide will walk you through every step, whether you’re a DIY enthusiast or a beginner.
Understanding Travel Limits on a Chamberlain Garage Door
Travel limits are pre-set ranges that tell your garage door opener how far the door should move up and down. These limits are essential for safety, convenience, and the longevity of your door system.
Read too: Tc1 Tricode Garage Door Opener Remote W/ Clip Chamberlain: Complete Guide
Why Travel Limits Matter:
- Prevent damage to the ceiling or floor.
- Ensure full engagement of the safety sensors.
- Maintain proper tension on the door springs.
- Reduce wear on the opener motor.
Industry data shows that about 35–40% of garage door service calls involve issues related to travel limits or improper opener adjustments. Ignoring these can shorten the life of your door system significantly.
Common Signs Your Travel Limits Need Adjustment
Before adjusting, recognize these warning signs:
- Door Doesn’t Open Fully: Stops short of the ceiling or retracts slightly.
- Door Doesn’t Close Completely: Leaves a gap at the bottom.
- Door Reverses While Closing: Even without obstruction, the auto-reverse is triggered.
- Excessive Motor Noise: The opener struggles or jerks when moving the door.
- Uneven Movement: The door slants when opening or closing, indicating imbalance.
Tools You’ll Need
You don’t need specialized tools for adjusting travel limits:
- Ladder or step stool (to reach the motor unit)
- Screwdriver (usually Phillips or flathead)
- Soft cloth (for cleaning sensors)
- Optional: Lubricant for tracks and rollers
Always disconnect power before starting to prevent accidents.
Step-By-Step Guide: How To Adjust Travel Limits On Chamberlain Garage Door
Step 1: Prepare Your Garage Door Opener
- Turn off Power: Unplug the opener from the electrical outlet.
- Clear the Area: Ensure no children, pets, or objects are near the door.
- Locate the Motor Unit: Mounted on the ceiling, typically in the center of the garage.
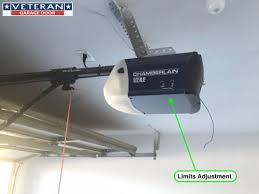
Step 2: Locate Travel Limit Knobs
- On the Chamberlain opener, you will see two adjustment knobs or screws labeled “Up” and “Down”.
- Up Knob: Controls how far the door opens.
- Down Knob: Controls how far the door closes.
Pro Tip: Some newer Chamberlain models use digital travel limit adjustments on the wall panel. Check your manual before proceeding.
Step 3: Adjust the Up Travel Limit
- Turn the Up knob clockwise to increase the opening height.
- Turn counterclockwise to decrease the height.
- Press the remote button to test the door.
- Ensure the door opens fully without hitting the ceiling.
Example: If your door stops 10–15 cm short of the ceiling, rotate the Up knob slightly clockwise and retest.
Step 4: Adjust the Down Travel Limit
- Turn the Down knob clockwise to allow the door to close completely.
- Turn counterclockwise if the door slams into the floor.
- Test the door several times, checking for a 2–3 mm gap from the floor for safety.
Tip: A properly adjusted door should close slowly and reverse automatically if it encounters an object.
Step 5: Test and Fine-Tune
- Run the door open and close several times.
- Observe movement: it should be smooth, level, and fully responsive.
- Make small adjustments if needed, never large turns that may damage the opener.
Safety Checks When Adjusting Travel Limits
Safety is critical when working with garage doors:
- Disconnect power first to avoid accidental activation.
- Never stand under a moving door.
- Test the auto-reverse system with a soft object like a rolled towel under the door.
- Avoid forcing the door manually; it should move freely when released from the opener.
According to the International Door Association (IDA), auto-reverse failures account for one-third of all garage door injuries.
Troubleshooting Common Problems
| Problem | Cause | Solution |
|---|---|---|
| Door won’t open fully | Up limit too low | Turn Up knob clockwise slightly |
| Door won’t close completely | Down limit too high | Turn Down knob clockwise slightly |
| Door reverses unexpectedly | Limit or force too sensitive | Adjust Down limit; check safety sensors |
| Motor makes noise | Binding or misaligned door | Lubricate tracks, check rollers, adjust springs |
| Uneven door movement | Track misalignment | Inspect and align tracks; tighten hardware |
Chamberlain Garage Door Force Settings
Sometimes travel limits are correct, but the force settings need adjustment. Force determines how much power the opener uses to move the door:
- Increase Force: If door reverses while closing.
- Decrease Force: If door slams or opens too aggressively.
Tip: Always adjust in small increments and test after each change. Proper force adjustment prevents motor strain and extends lifespan.
Maintenance Tips for Long-Term Performance
- Clean sensors every 6 months to avoid obstruction.
- Lubricate rollers, hinges, and tracks with a silicone-based spray.
- Inspect cables and springs for wear or fraying.
- Test travel limits and force settings regularly to ensure smooth operation.
Regular maintenance reduces service calls and improves safety for your family.
Real-Life Case Study
Scenario: John, a homeowner in Texas, noticed his Chamberlain garage door stopped 5 cm short of closing fully. After consulting the manual, he:
- Turned the Down travel limit knob slightly clockwise.
- Tested the door three times, adjusting until the door closed perfectly.
- Cleaned the sensors and lubricated the rollers.
Result: John’s door now closes completely without holding the button, and the opener motor runs quietly.
This simple adjustment saved him a service call of over $150.
External Reference
For a comprehensive overview of garage door mechanics and safety features, refer to Wikipedia: Garage Door.
FAQ: How To Adjust Travel Limits On Chamberlain Garage Door
Q1: Can I adjust travel limits without calling a professional?
A: Yes, Chamberlain openers are designed for homeowner adjustment. Just follow the steps carefully and always test after each change.
Q2: How often should I check travel limits?
A: Every 6–12 months, or after heavy usage or extreme weather.
Q3: What happens if the door keeps reversing?
A: Check both travel limits and force settings. Ensure safety sensors are clean and aligned.
Q4: Can improper adjustments damage my door?
A: Yes, excessive force or incorrect travel limit settings can strain the motor and wear out springs.
Q5: How do I know if my model uses digital vs. manual adjustment?
A: Consult your Chamberlain manual. Some newer models feature wall panel digital settings instead of knobs.
Q6: Is it necessary to lubricate after adjusting travel limits?
A: Yes, lubrication ensures smooth operation and reduces motor strain, extending the life of your opener and door.
Conclusion
Mastering how to adjust travel limits on Chamberlain garage door is essential for safety, smooth operation, and the longevity of your door system. By following the step-by-step instructions, performing routine maintenance, and testing safety features, you can prevent costly repairs and ensure your garage door functions perfectly.
Share this guide with friends or family who need a reliable, DIY-friendly solution to garage door problems. A properly adjusted garage door is not only convenient but also keeps your home safe.
Leave a Reply