If you’re trying to understand a Craftsman 1 2 Hp Garage Door Opener Parts Diagram, you’re likely dealing with a repair, upgrade, or maintenance issue. At first glance, the diagram may look complicated—but once you break it down, each component has a clear role. In this guide, we’ll walk you through every part, how they work together, and how to troubleshoot like a pro.
What Is a Craftsman 1/2 HP Garage Door Opener?
A Craftsman 1/2 HP garage door opener is one of the most commonly used systems in residential homes across the U.S.
Read too: How Do You Change Code On Garage Door Keypad Fast?
Why It’s Popular:
- Reliable lifting power for standard doors
- Affordable compared to higher HP models
- Compatible with most garage door types
- Easy to maintain and repair
👉 These systems combine mechanical and electrical components, similar to those described in this Wikipedia article on garage doors, which explains how automation improves safety and efficiency.
Craftsman 1 2 Hp Garage Door Opener Parts Diagram Overview
A parts diagram visually represents how all components connect and function together.
Main Sections of the System:
- Motor Assembly
- Drive System (chain/belt)
- Rail System
- Door Connection Components
- Safety & Control Systems
Complete Parts Breakdown (Detailed Explanation)
Let’s go deeper into each component and its function.
1. Motor Unit (Power Core)
The motor unit is the brain and muscle of the opener.
What It Does:
- Converts electrical energy into motion
- Drives the chain or belt
Inside the Motor Unit:
- Circuit board
- Drive gear
- Capacitor
Common Problems:
- Burnt-out motor
- Worn gears
- Electrical failure
2. Drive Gear and Sprocket
This small but critical part transfers power.
Function:
- Connects motor to drive system
Signs of Failure:
- Grinding noise
- Door not moving
3. Rail Assembly (Guidance System)
The rail is the track along which the trolley moves.
Features:
- Long metal bar
- Mounted to ceiling
Issues:
- Misalignment
- Dirt buildup
4. Chain or Belt Drive
This is the system that physically moves the door.
Chain Drive:
Pros:
- Durable
- Strong
Cons:
- Noisy
Belt Drive:
Pros:
- Quiet
- Smooth operation
Cons:
- Slightly more expensive
Comparison Table:
| Feature | Chain Drive | Belt Drive |
|---|---|---|
| Noise | High | Low |
| Durability | High | Medium |
| Cost | Lower | Higher |
5. Trolley/Carriage Assembly
This component connects the opener to the garage door.
Function:
- Moves along the rail
- Pulls or pushes the door
Common Issues:
- Sticking
- Disconnection
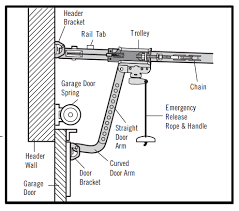
6. Emergency Release Cord
This is the red cord hanging from the trolley.
Purpose:
- Allows manual operation during power failure
Important Tip:
Always pull straight down to disengage safely.
7. Header Bracket
- Mounts the rail to the wall above the door
- Provides stability
8. Door Arm (Straight & Curved)
Connects trolley to the door.
Two Types:
- Straight arm
- Curved arm
9. Safety Sensors (Photo Eyes)
These are critical safety components.
Located:
- Near the floor on both sides
Function:
- Detect obstacles
- Prevent door from closing on objects
10. Wall Control Panel
Mounted inside your garage.
Functions:
- Open/close door
- Turn on lights
- Lock system
11. Remote Control
Wireless device for convenience.
Features:
- Multiple button control
- Rolling code security
12. Limit Switches
Control how far the door moves.
Functions:
- Set open position
- Set close position
Full Diagram (Text Visualization)
        [Motor Unit]
            |
     [Drive Gear/Sprocket]
            |
        [Chain/Belt]
            |
        [Rail Assembly]
            |
        [Trolley]
            |
        [Door Arm]
            |
      [Garage Door Panel][Safety Sensors]    [Safety Sensors]
      |                  |
   Left Side         Right Side[Wall Panel]     [Remote Control]
How All Parts Work Together
Understanding interaction is key.
Step-by-Step Operation:
- Remote or wall button sends signal
- Motor unit activates
- Drive gear turns chain/belt
- Trolley moves along rail
- Door arm lifts or lowers door
- Sensors monitor safety
Step-by-Step Troubleshooting Using the Diagram
Step 1: Identify the Symptom
- Door won’t move
- Door stops halfway
- Loud noise
Step 2: Locate the Related Part
| Problem | Likely Part |
|---|---|
| No movement | Motor / gear |
| Jerky motion | Rail / trolley |
| Won’t close | Sensors |
Step 3: Inspect the Component
Check for:
- Wear
- Dirt
- Loose connections
Step 4: Apply Fix
- Tighten bolts
- Clean parts
- Replace damaged components
Common Problems and Solutions
1. Garage Door Won’t Open
Cause:
- Broken gear
- Motor failure
Fix:
- Replace gear or motor
2. Door Makes Loud Noise
Cause:
- Dry chain
- Worn rollers
Fix:
- Lubricate moving parts
3. Door Reverses Immediately
Cause:
- Sensor misalignment
Fix:
- Align sensors
4. Door Moves Unevenly
Cause:
- Rail misalignment
Fix:
- Adjust rail
Maintenance Guide (Step-by-Step)
Regular maintenance keeps your system running smoothly.
Monthly Maintenance Routine:
- Inspect all visible parts
- Lubricate chain, rollers, hinges
- Test safety sensors
- Check door balance
- Tighten hardware
Recommended Lubrication:
- Use silicone-based lubricant
- Avoid grease buildup
Replacement Parts Guide
Most Replaced Components:
- Drive gear
- Safety sensors
- Chain or belt
- Remote batteries
Cost Breakdown (US Average):
| Part | Cost Range |
|---|---|
| Drive gear | $10–$30 |
| Sensors | $20–$60 |
| Chain/Belt | $50–$150 |
| Motor unit | $150–$300 |
DIY vs Professional Repair
Safe DIY Tasks:
- Sensor cleaning
- Lubrication
- Tightening bolts
Professional Required:
- Spring repair
- Motor replacement
- Electrical issues
Real-Life Case Study
A homeowner notices their garage door stops halfway.
Diagnosis:
- Check diagram → trolley area
- Inspect → trolley stuck
Fix:
- Clean rail
- Reconnect trolley
👉 Result: Problem solved in under 15 minutes.
Advantages of Understanding the Parts Diagram
Benefits:
- ✅ Faster troubleshooting
- ✅ Lower repair costs
- ✅ Better communication with technicians
- ✅ Increased confidence
When Should You Replace the Entire Opener?
Consider replacement if:
- Unit is over 15 years old
- Frequent repairs are needed
- Safety features are outdated
Expert Tips for Long-Term Performance
1. Keep Components Clean
Dust and debris cause wear.
2. Don’t Ignore Small Issues
Small problems become expensive repairs.
3. Schedule Annual Inspection
Prevents major failures.
Frequently Asked Questions
FAQ: Craftsman 1 2 Hp Garage Door Opener Parts Diagram
1. What is the most important part of the opener?
The motor unit powers the entire system.
2. Can I replace parts myself?
Yes, but only simple components like sensors or chains.
3. How do I find the right replacement part?
Use your model number and match it with the diagram.
4. Why is my opener making noise?
Usually due to lack of lubrication or worn parts.
5. How long does a Craftsman opener last?
Typically 10–15 years with proper care.
6. Are all parts interchangeable?
Not always—check compatibility with your model.
Conclusion
Understanding the Craftsman 1 2 Hp Garage Door Opener Parts Diagram gives you a clear advantage in maintaining and repairing your system.
By:
- Learning each component
- Using the diagram to diagnose issues
- Performing regular maintenance
You can extend the life of your garage door opener and avoid costly repairs.
Leave a Reply