If you’re trying to fix or understand your opener, a Craftsman 1/2 HP garage door opener parts diagram can make everything clearer. Instead of guessing what’s wrong, knowing each component helps you troubleshoot faster and avoid costly repairs. This guide breaks down every major part in simple terms—perfect for beginners and DIY homeowners.
What Is a Craftsman 1/2 HP Garage Door Opener Parts Diagram?
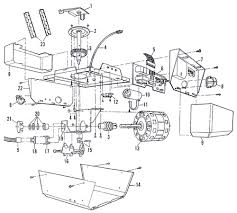
A Craftsman 1/2 HP garage door opener parts diagram is a visual representation of all the components inside your garage door opener system. It shows how each part connects and works together.
👉 Learn more about how garage door openers function: https://en.wikipedia.org/wiki/Garage_door_opener
Why Understanding the Parts Diagram Matters
Knowing your opener’s parts gives you a major advantage.
Read too: Tc1 Tricode Garage Door Opener Remote W/ Clip Chamberlain: Complete Guide
Key Benefits
- Faster troubleshooting
- Easier repairs
- Better maintenance
- Cost savings on service calls
📊 Studies in home maintenance show that DIY knowledge can reduce repair costs by up to 40%.
Main Components in a Craftsman 1/2 HP Garage Door Opener
Let’s break down the essential parts you’ll see in a typical diagram.
1. Motor Unit
The motor is the heart of the system.
Function:
- Powers the opening and closing mechanism
Common Issues:
- Overheating
- Worn internal gears
2. Drive System (Chain/Belt/Screw)
This connects the motor to the door.
Types:
- Chain drive (durable but noisy)
- Belt drive (quiet but pricier)
- Screw drive (low maintenance)
3. Rail Assembly
The rail guides the door movement.
Includes:
- Track
- Trolley
👉 The trolley moves along the rail to open or close the door.
4. Trolley (Carriage)
This part connects the opener to the garage door.
Function:
- Transfers motion from the motor to the door
5. Garage Door Arm
Function:
- Links the trolley to the door
Tip: Ensure tight connections to avoid jerky motion.
6. Safety Sensors
Located near the floor on both sides.
Function:
- Prevent the door from closing if something is in the way
📏 Installed 4–6 inches above ground
7. Limit Switches
These control how far the door opens and closes.
Common Issue:
- Incorrect settings causing partial movement
8. Logic Board (Circuit Board)
The “brain” of the opener.
Function:
- Controls signals from remotes and sensors
9. Remote Control & Wall Panel
Function:
- Send commands to the opener
10. Light Bulb & Housing
Provides illumination when the door operates.
Craftsman 1/2 HP Garage Door Opener Parts Overview
Quick Reference Table
| Part | Function | Common Problem |
|---|---|---|
| Motor | Drives system | Overheating |
| Chain/Belt | Transfers motion | Wear & noise |
| Rail | Guides movement | Misalignment |
| Trolley | Moves door | Sticking |
| Sensors | Safety detection | Misalignment |
| Logic board | Controls system | Signal failure |
How to Use the Parts Diagram for Troubleshooting
Understanding the Craftsman 1/2 HP garage door opener parts diagram helps you pinpoint problems quickly.
Step-by-Step Troubleshooting
Step 1: Identify the Problem
- Door not moving? → Check motor
- Door reverses? → Check sensors
- No response? → Check logic board
Step 2: Match the Issue to the Diagram
Locate the affected part visually.
Step 3: Inspect the Component
- Look for wear or damage
- Check alignment and connections
Step 4: Repair or Replace
- Tighten loose parts
- Replace worn components
Step 5: Test the System
Run the door 3–5 times to ensure smooth operation.
Common Problems Explained Using the Diagram
1. Door Won’t Open
Possible causes:
- Motor failure
- Broken drive system
2. Door Reverses Suddenly
Possible causes:
- Sensor misalignment
- Obstruction
3. Noisy Operation
Possible causes:
- Worn chain
- Lack of lubrication
4. Remote Not Working
Possible causes:
- Dead battery
- Faulty logic board
Maintenance Tips Based on Parts
Keeping your system in good condition is easier when you understand the diagram.
Monthly Maintenance Checklist
- Inspect sensors
- Clean tracks
- Tighten bolts
- Test safety reverse
Lubrication Guide
Apply lubricant to:
- Chain or belt
- Rollers
- Hinges
👉 Avoid over-lubricating—use a light coating only.
Advantages vs Disadvantages of Using a Parts Diagram
Advantages
- Easier DIY repairs
- Better understanding of system
- Faster troubleshooting
Disadvantages
- Can be confusing at first
- Requires basic mechanical knowledge
- Not all models are identical
When Should You Replace Parts?
Replace components if:
- Visible wear or damage
- Frequent malfunctions
- Parts are over 10–15 years old
Safety Tips When Working with Garage Door Parts
- Disconnect power before repairs
- Avoid touching springs (high tension)
- Use proper tools
- Wear safety gloves
FAQ: Craftsman 1/2 HP Garage Door Opener Parts Diagram
1. Where can I find a parts diagram for my Craftsman opener?
You can find it in the user manual or on manufacturer websites.
2. Are all Craftsman 1/2 HP parts the same?
No. Parts may vary depending on the model and year.
3. Can I replace parts myself?
Yes, for basic components like sensors or remotes. Complex parts may require a technician.
4. What is the most commonly replaced part?
Safety sensors and drive chains are the most frequently replaced.
5. How long do garage opener parts last?
Most parts last 10–15 years with proper maintenance.
6. Do I need special tools for repairs?
Basic tools like a wrench and screwdriver are usually enough.
Conclusion
Understanding a Craftsman 1/2 HP garage door opener parts diagram gives you the power to diagnose issues, perform maintenance, and even handle simple repairs yourself. Instead of guessing, you can confidently identify each component and keep your garage door system running smoothly.
With regular care and a basic understanding of your opener’s parts, you can extend its lifespan and avoid unnecessary repair costs.
Leave a Reply